Difference between revisions of "API: connection"
| Line 38: | Line 38: | ||
| | | | ||
| − | '''[https://docs.brainycp.io/index.php/API: | + | '''[https://docs.brainycp.io/index.php/API:_Webserver_status <font><font>API: web server status</font></font>]''' |
|- | |- | ||
| Line 48: | Line 48: | ||
| | | | ||
| − | '''[https://docs.brainycp.io/index.php/API: | + | '''[https://docs.brainycp.io/index.php/API:_Transfer_between_servers <font><font>API: transfer between servers</font></font>]''' |
|- | |- | ||
| Line 58: | Line 58: | ||
| | | | ||
| − | '''[https://docs.brainycp.io/index.php/API: | + | '''[https://docs.brainycp.io/index.php/API:_Manage_webserver <font><font>API: web server management</font></font>]''' |
|- | |- | ||
| Line 68: | Line 68: | ||
| | | | ||
| − | '''[https://docs.brainycp.io/index.php/API: | + | '''[https://docs.brainycp.io/index.php/API:_Managing_mailboxes <font><font>API: mailbox management</font></font>]''' |
|- | |- | ||
| Line 78: | Line 78: | ||
| | | | ||
| − | '''[https://docs.brainycp.io/index.php/API: | + | '''[https://docs.brainycp.io/index.php/API:_Manage_DNS-zones <font><font>API: DNS zone management</font></font>]''' |
|- | |- | ||
| Line 88: | Line 88: | ||
| | | | ||
| − | '''[https://docs.brainycp.io/index.php/API: | + | '''[https://docs.brainycp.io/index.php/API:_Webserver_Installation <font><font>API: web server installation</font></font>]''' |
|- | |- | ||
| Line 98: | Line 98: | ||
| | | | ||
| − | '''[https://docs.brainycp.io/index.php/API: | + | '''[https://docs.brainycp.io/index.php/API:_host-accounts <font><font>API: host accounts</font></font>]''' |
|- | |- | ||
| Line 118: | Line 118: | ||
| | | | ||
| − | '''[https://docs.brainycp.io/index.php/API:_FTP- | + | '''[https://docs.brainycp.io/index.php/API:_FTP-server <font><font>API: FTP server</font></font>]''' |
|- | |- | ||
Revision as of 14:10, 17 November 2021
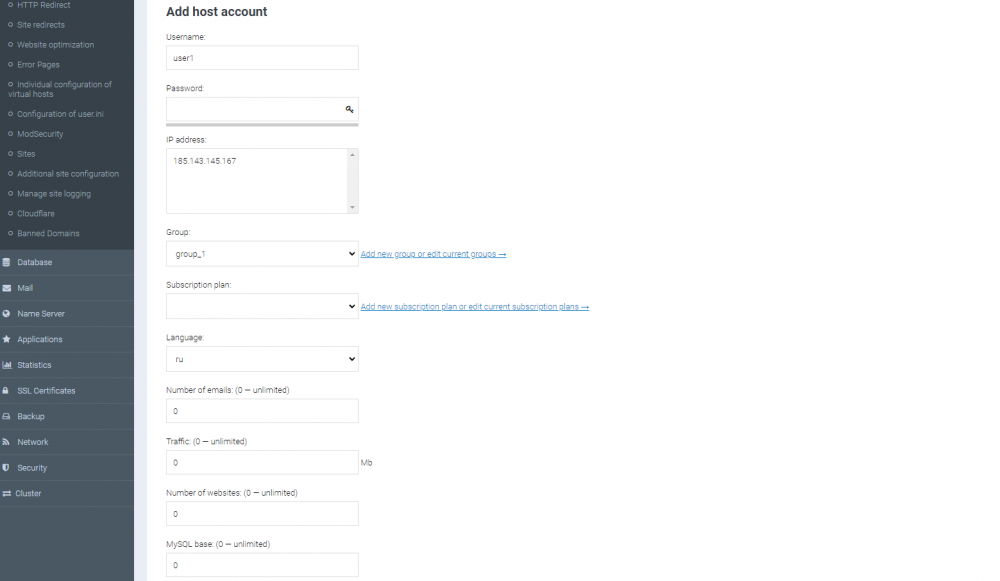
To connect via the API, you need to create a host account in your Brainy dashboard:
go to the "Host Accounts" section → fill in the fields in the "Add Host Account" section:
- Username;
- password;
- IP address;
- group (if there is no group, create);
- tariff (if there is no tariff, create);
- language;
- shell access;
- owner.
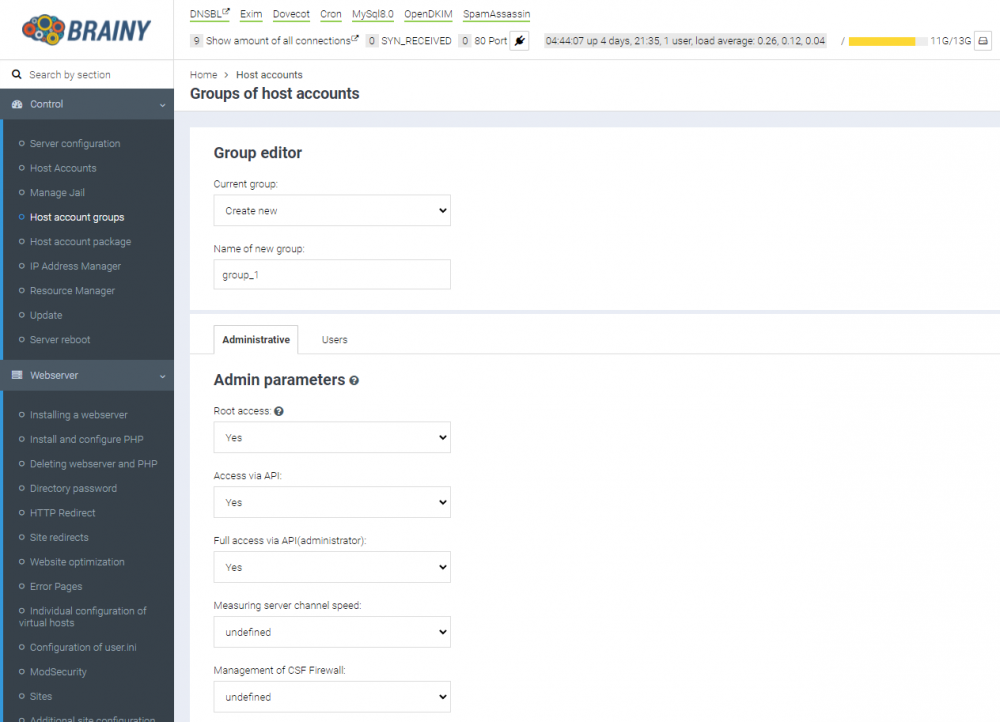
When creating a group, you must enable the "API access" and / or "Full API access (administrator)" option. The last parameter is responsible for adding administrative functions:
Go back to creating a host account and assign a group to the user who will be given the API connection:
To connect via the API, you need to open a new page in your browser and enter http://your-IP:8002/api/api.php?Login=username&pass=password. If done correctly, you will see a blank page:

If you entered an incorrect username or password, an error {"code": 1, "message": "Not perm2"} is displayed:
Другие полезные статьи:


