Difference between revisions of "Webserver installation"
From BrainyCP
m (Protected "Webserver installation" ([Edit=Allow only administrators] (indefinite) [Move=Allow only administrators] (indefinite))) |
|||
| (4 intermediate revisions by one other user not shown) | |||
| Line 1: | Line 1: | ||
| + | <div data-placeholder="Перевод" dir="ltr" id="tw-target-text">To install the web server, go to the "Web server" / "Manage web server" section of the admin panel.</div> <div data-placeholder="Перевод" dir="ltr" id="tw-target-text">On the "Web Server" tab, do the following:</div> | ||
| + | <br/> 1. Use the apache control buttons in the "Manage apache" block: "Start", "Stop", "Restart", "Force restart". | ||
| − | + | <br/> 2. Select your fpm version in the "Manage fpm" box. If necessary, check the "Run for all FPM" box. Use the fpm control buttons: Run, Stop, Restart: | |
| − | + | [[File:2020-12-19 23-37-21.png|border|2020-12-19 23-37-21.png]] | |
| − | + | 3. Select ready-made bundles (web server and PHP version) to install in the "Installing pre-built bundles" section. Click on the "Install" button: | |
| − | + | [[File:2020-12-19 23-40-37.png|border|2020-12-19 23-40-37.png]] | |
| − | + | 4. Configure the use of Apache MPM. Click on the "Apply" button. | |
| − | + | <br/> 5. Configure client options. Click on the "Apply" button: | |
| − | [[File:2020- | + | [[File:2020-12-19 23-41-48.png|border|2020-12-19 23-41-48.png]] |
| − | 6. | + | 6. Edit your Apache configuration. Click on the "Save" button. Click on the "Reassemble virtual hosts" button: |
| − | [[File:2020- | + | [[File:2020-12-19 23-43-57.png|border|2020-12-19 23-43-57.png]] |
| + | <pre data-placeholder="Перевод" dir="ltr" id="tw-target-text">On the "PHP" tab, install PHP versions and PHP extensions:</pre> | ||
| − | + | [[File:2020-12-19 23-45-35.png|border|2020-12-19 23-45-35.png]] | |
| + | <pre data-placeholder="Перевод" dir="ltr" id="tw-target-text">The "Uninstall" tab removes the previously set options. To remove an installation, mark it with a tick and click on the "Remove" button:</pre> | ||
| − | [[File:2020- | + | [[File:2020-12-19 23-48-11.png|border|2020-12-19 23-48-11.png]] |
| − | |||
| − | |||
| − | |||
| − | |||
Latest revision as of 11:40, 26 July 2021
To install the web server, go to the "Web server" / "Manage web server" section of the admin panel.
On the "Web Server" tab, do the following:
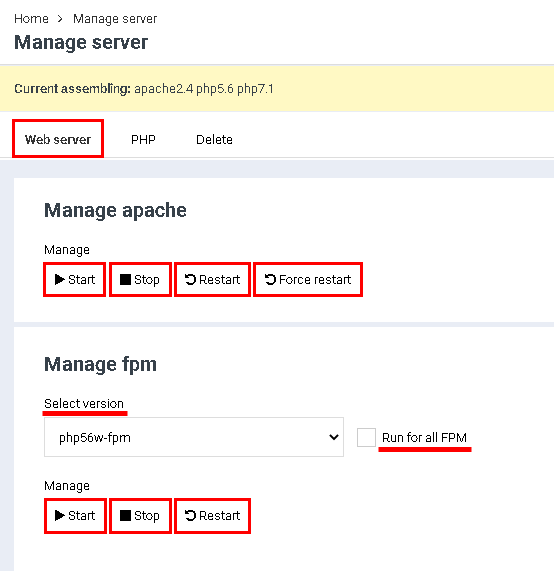
1. Use the apache control buttons in the "Manage apache" block: "Start", "Stop", "Restart", "Force restart".
2. Select your fpm version in the "Manage fpm" box. If necessary, check the "Run for all FPM" box. Use the fpm control buttons: Run, Stop, Restart:
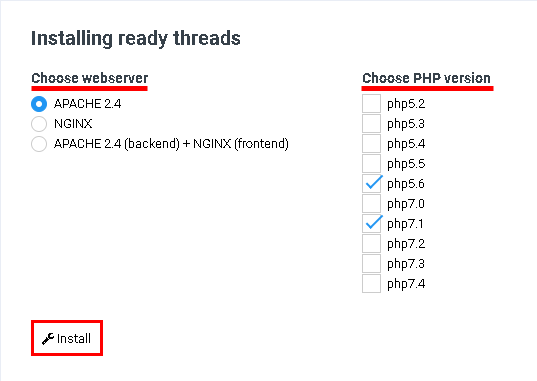
3. Select ready-made bundles (web server and PHP version) to install in the "Installing pre-built bundles" section. Click on the "Install" button:
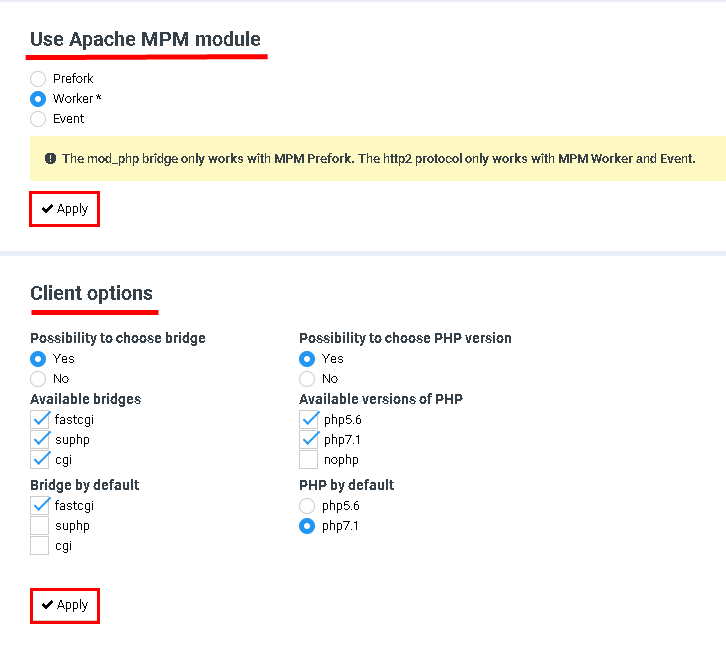
4. Configure the use of Apache MPM. Click on the "Apply" button.
5. Configure client options. Click on the "Apply" button:
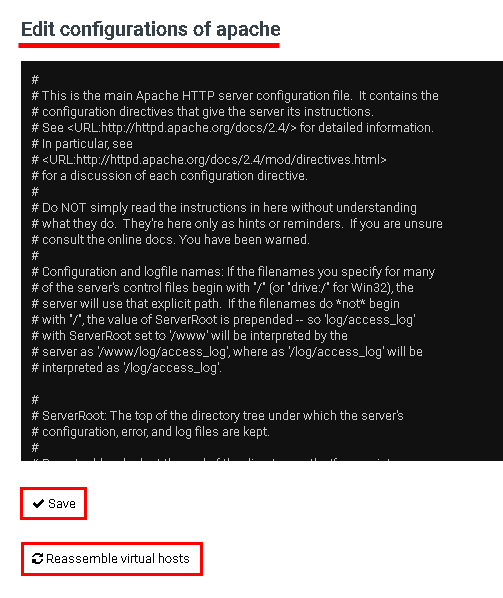
6. Edit your Apache configuration. Click on the "Save" button. Click on the "Reassemble virtual hosts" button:
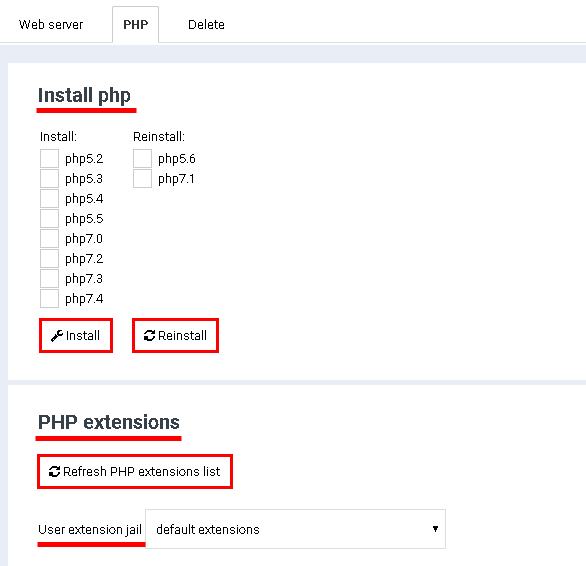
On the "PHP" tab, install PHP versions and PHP extensions:
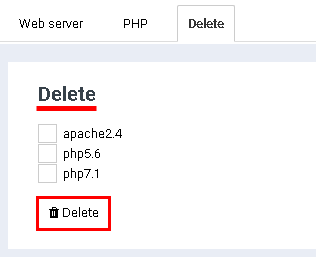
The "Uninstall" tab removes the previously set options. To remove an installation, mark it with a tick and click on the "Remove" button:
