Difference between revisions of "Manage DNS-zones"
From BrainyCP
| Line 1: | Line 1: | ||
| + | <div data-placeholder="Перевод" dir="ltr" id="tw-target-text">To add / remove / change a DNS zone, go to the "Name server" / "Manage DNS zones" section of the admin panel.<br/> </div> <div data-placeholder="Перевод" dir="ltr" id="tw-target-text">To add a DNS zone, fill in the fields in the "Add DNS zone" section (Pointer 1):</div> | ||
| + | *<div data-placeholder="Перевод" dir="ltr" id="tw-target-text">Select a user from the dropdown list.</div> <div> </div> | ||
| + | *<div data-placeholder="Перевод" dir="ltr" id="tw-target-text">Enter the DNS zone in the "Zone" field.</div> <div> </div> | ||
| + | *<div data-placeholder="Перевод" dir="ltr" id="tw-target-text">Enter the IP address in the "IP" field.</div> <div> </div> | ||
| + | <div data-placeholder="Перевод" dir="ltr" id="tw-target-text">Click on the "Add" button.</div> <div data-placeholder="Перевод" dir="ltr"> </div> <div data-placeholder="Перевод" dir="ltr" id="tw-target-text">As a result, the DNS zone will be added to the "List of user DNS zones" block (the list of user DNS zones is available to the administrator; the user sees only his own DNS zones). After checking the box "Show zones of all users", a block with a list of all available zones opens automatically (Index 2):</div> | ||
| + | *<div data-placeholder="Перевод" dir="ltr" id="tw-target-text">To select a specific user's DNS zone, select a user in the User Zones field.</div> <div> </div> | ||
| + | *<div data-placeholder="Перевод" dir="ltr" id="tw-target-text">To show the zones of all users, check the box next to "Show zones of all users".</div> <div> </div> | ||
| + | *<div data-placeholder="Перевод" dir="ltr" id="tw-target-text">To update the DNS zones cache, click on the "Update cache of DNS zones" button.</div> <div> </div> | ||
| + | <div data-placeholder="Перевод" dir="ltr" id="tw-target-text">To change the DNS zone, click on the "Edit" button opposite it, to delete - click on the "Delete" button:</div> | ||
| + | [[File:2020-12-20 1-53-23.png|border|2020-12-20 1-53-23.png]] | ||
| + | <pre data-placeholder="Перевод" dir="ltr" id="tw-target-text">After clicking on the "Edit" button, the "Filezone" page opens, in which various settings are available:</pre> | ||
| − | + | [[File:2020-12-20 2-02-43.png|border|2020-12-20 2-02-43.png]] | |
| − | |||
| − | |||
| − | |||
| − | |||
| − | |||
| − | |||
| − | |||
| − | |||
| − | |||
| − | |||
| − | |||
| − | |||
| − | |||
| − | |||
| − | |||
| − | |||
| − | |||
| − | [[File:2020-12-20 | ||
| − | |||
| − | |||
| − | |||
| − | |||
Revision as of 21:25, 2 April 2021
To add / remove / change a DNS zone, go to the "Name server" / "Manage DNS zones" section of the admin panel.
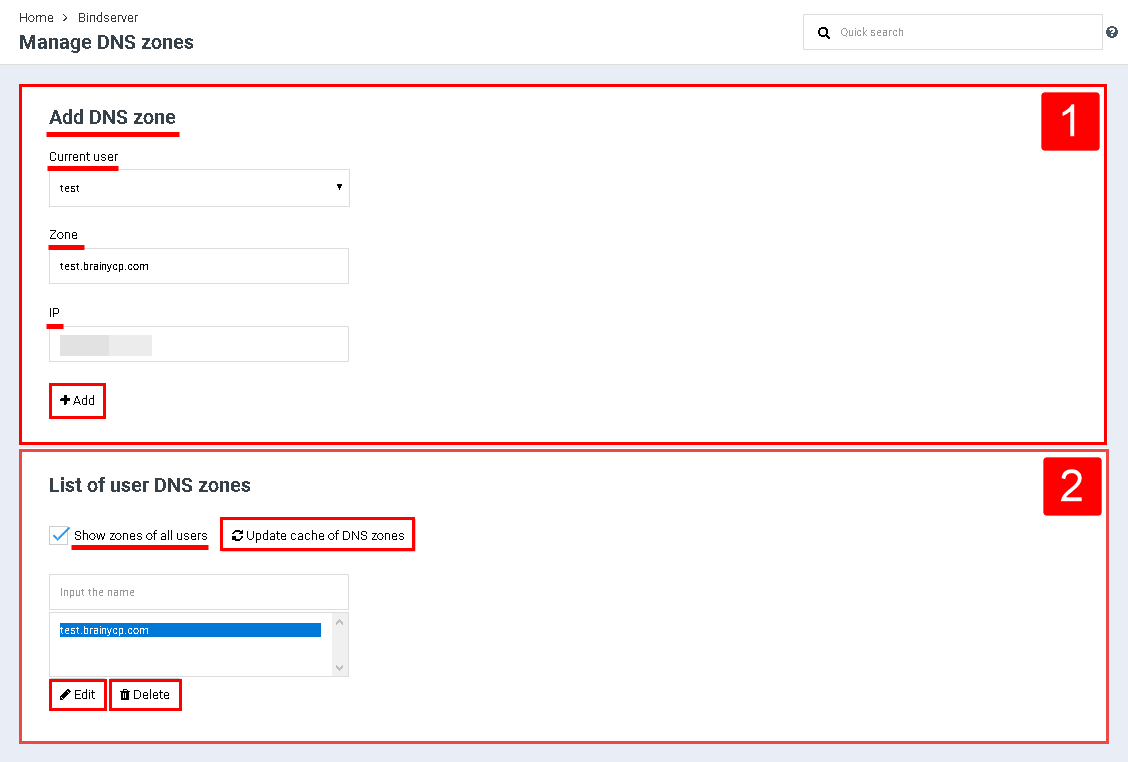
To add a DNS zone, fill in the fields in the "Add DNS zone" section (Pointer 1):
- Select a user from the dropdown list.
- Enter the DNS zone in the "Zone" field.
- Enter the IP address in the "IP" field.
Click on the "Add" button.
As a result, the DNS zone will be added to the "List of user DNS zones" block (the list of user DNS zones is available to the administrator; the user sees only his own DNS zones). After checking the box "Show zones of all users", a block with a list of all available zones opens automatically (Index 2):
- To select a specific user's DNS zone, select a user in the User Zones field.
- To show the zones of all users, check the box next to "Show zones of all users".
- To update the DNS zones cache, click on the "Update cache of DNS zones" button.
To change the DNS zone, click on the "Edit" button opposite it, to delete - click on the "Delete" button:
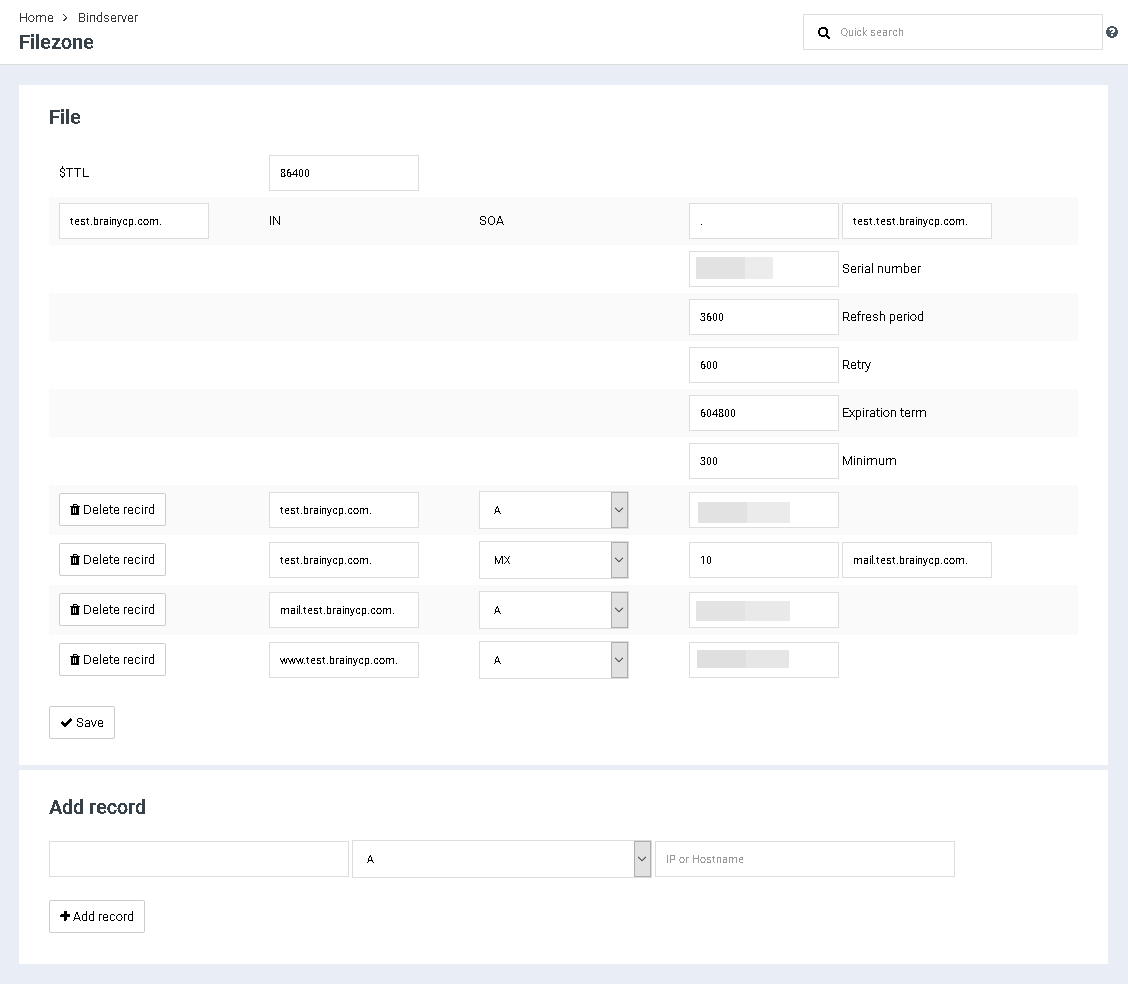
After clicking on the "Edit" button, the "Filezone" page opens, in which various settings are available:

