Difference between revisions of "Transfer between servers"
From BrainyCP
(Новая страница: « Чтобы выполнить перенос аккаунта с одного сервера на другой, пеерйдите в раздел "Резерв…») |
|||
| Line 1: | Line 1: | ||
| + | <div data-placeholder="Перевод" dir="ltr">To transfer your account from one server to another, go to the "Backup" / "Transfers between servers" section.<br/> In the "Transferring Accounts" section, do the following:</div> <div data-placeholder="Перевод" dir="ltr">In the "Transfer accounts" section, select the item "Transfer accounts to a remote server" or "Transfer accounts from a remote server" (Index 1).<br/> In the "Authorization" block, fill in the fields (Index 2):<br/> "Enter data for htpasswd authorization" - check the box to enter the data "Login htpasswd" and "Password htpasswd".<br/> "Authorization type" - select the type of authorization.<br/> "Server IP or hostname to transfer to" - specify the IP of the server or hostname to transfer to.<br/> "Login" - enter your login.</div> | ||
| + | * | ||
| + | ** To generate the key, click on the button "Generate key". To save the key, click on the "Save the key". | ||
| + | ** As the result, the key will be shown in the section "Public key", "Secret key". | ||
| + | ** "Port" - set up the port (by default - 22). | ||
| + | ** To check the connect, click on the button "Check connect". To get the list of IP, click on the button "Get the list of IP". | ||
| + | *In the block "Transfer settings" choose the users in the field "List of users", if it's necessary to show only free IP, check the corresponding field, in "IP list on remote server" set up the IP list IP and click on the button "Start transfer" (Index 3). | ||
| − | + | Info about completed transferswill be shown in the list "Transfer history" (Index 4). | |
| − | + | [[File:2021-04-19-account-transferring-01.png|border|2021-04-19-account-transferring-01.png]] | |
| − | |||
| − | |||
| − | |||
| − | |||
| − | |||
| − | |||
| − | |||
| − | |||
| − | |||
| − | |||
| − | |||
| − | |||
| − | |||
| − | |||
Revision as of 22:04, 19 April 2021
To transfer your account from one server to another, go to the "Backup" / "Transfers between servers" section.
In the "Transferring Accounts" section, do the following:
In the "Transferring Accounts" section, do the following:
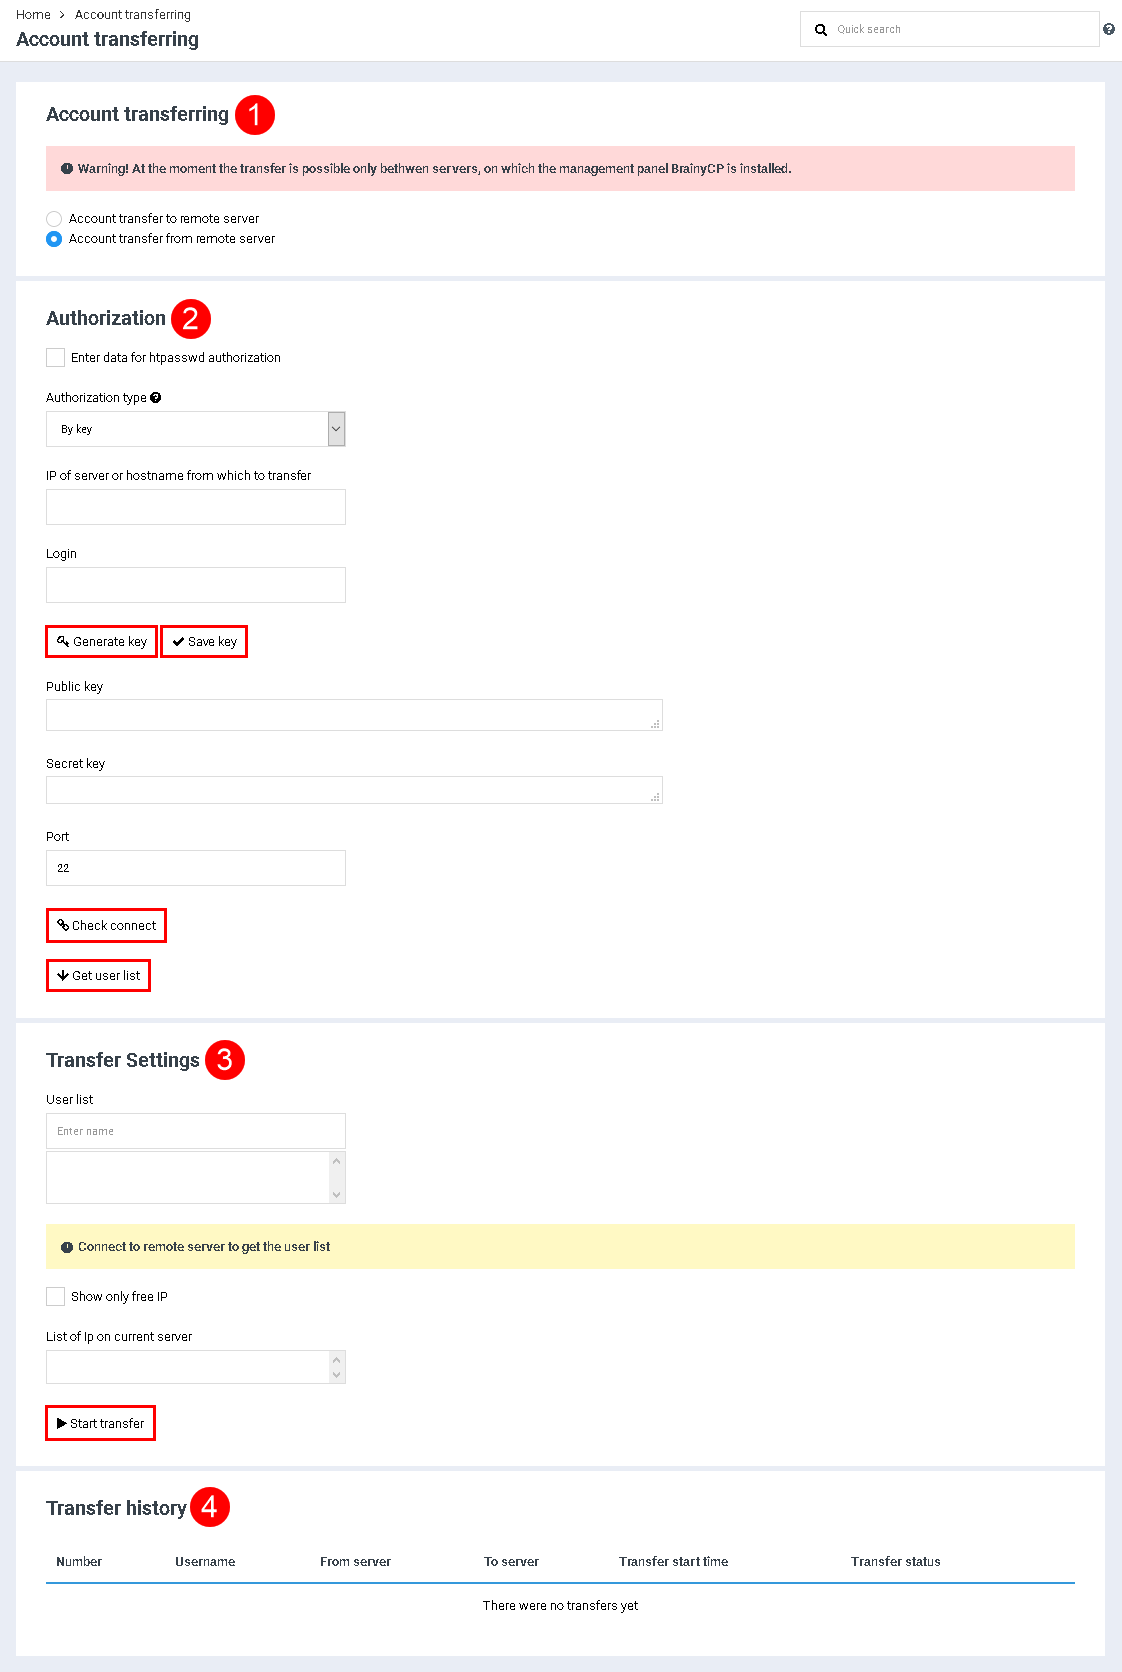
In the "Transfer accounts" section, select the item "Transfer accounts to a remote server" or "Transfer accounts from a remote server" (Index 1).
In the "Authorization" block, fill in the fields (Index 2):
"Enter data for htpasswd authorization" - check the box to enter the data "Login htpasswd" and "Password htpasswd".
"Authorization type" - select the type of authorization.
"Server IP or hostname to transfer to" - specify the IP of the server or hostname to transfer to.
"Login" - enter your login.
-
- To generate the key, click on the button "Generate key". To save the key, click on the "Save the key".
- As the result, the key will be shown in the section "Public key", "Secret key".
- "Port" - set up the port (by default - 22).
- To check the connect, click on the button "Check connect". To get the list of IP, click on the button "Get the list of IP".
- In the block "Transfer settings" choose the users in the field "List of users", if it's necessary to show only free IP, check the corresponding field, in "IP list on remote server" set up the IP list IP and click on the button "Start transfer" (Index 3).
Info about completed transferswill be shown in the list "Transfer history" (Index 4).
