Difference between revisions of "Set up CRON-task"
From BrainyCP
| Line 1: | Line 1: | ||
| − | + | <div data-placeholder="Перевод" dir="ltr" id="tw-target-text">To set up a CRON job in the BrainyCP hosting control panel, go to the Utilities / CRON jobs section:<br/> </div> <div data-placeholder="Перевод" dir="ltr" id="tw-target-text">If necessary, enter the email address in the "Email (for sending notifications)" field, to which messages about the completion of the task will be received. click on the "Save email" button.<br/> </div> <div data-placeholder="Перевод" dir="ltr" id="tw-target-text">Be sure to set the time and frequency of the task, enter the task in the "Command" field. click on the "Add command" button.<br/> </div> <div data-placeholder="Перевод" dir="ltr" id="tw-target-text">'''Note:''' if you select * in the drop-down list, the CRON task will be executed every minute, hour, day, etc.</div> <div data-placeholder="Перевод" dir="ltr">After the command is added, it will appear in the list of tasks:<br/> </div> <div data-placeholder="Перевод" dir="ltr">1. Click on the "Run" button to start the task.<br/> 2. Click on the "Edit" button to make adjustments to the job settings.<br/> 3. Click on the "Delete" button to remove a command from the list of tasks.<br/> 4. Use the switch to enable / disable the command:</div> | |
| − | + | [[File:2020-12-23 11-06-36.png|border|2020-12-23 11-06-36.png]] | |
| − | |||
| − | |||
| − | |||
| − | |||
| − | |||
| − | |||
| − | |||
| − | |||
| − | |||
| − | |||
| − | |||
| − | |||
| − | |||
| − | |||
| − | [[File:2020-12-23 11-06-36.png|border]] | ||
Revision as of 22:34, 2 April 2021
To set up a CRON job in the BrainyCP hosting control panel, go to the Utilities / CRON jobs section:
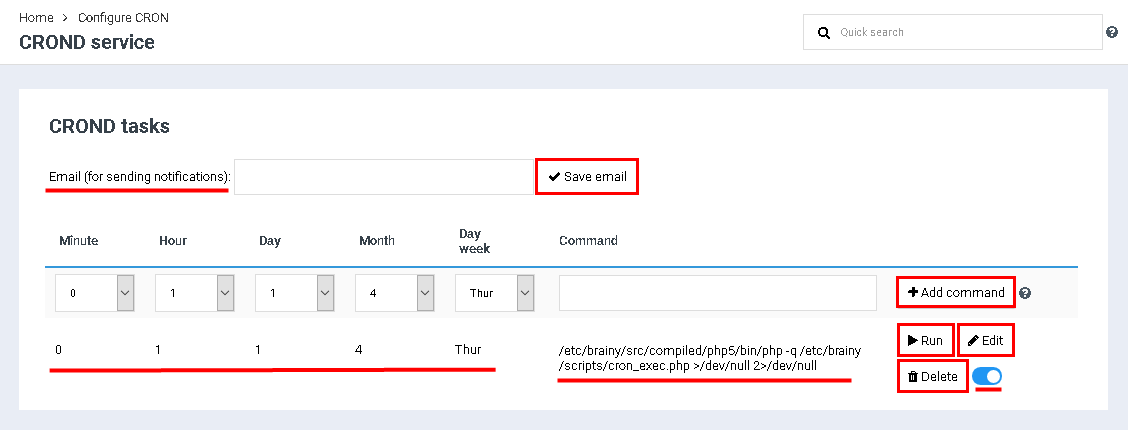
If necessary, enter the email address in the "Email (for sending notifications)" field, to which messages about the completion of the task will be received. click on the "Save email" button.
Be sure to set the time and frequency of the task, enter the task in the "Command" field. click on the "Add command" button.
Note: if you select * in the drop-down list, the CRON task will be executed every minute, hour, day, etc.
After the command is added, it will appear in the list of tasks:
1. Click on the "Run" button to start the task.
2. Click on the "Edit" button to make adjustments to the job settings.
3. Click on the "Delete" button to remove a command from the list of tasks.
4. Use the switch to enable / disable the command:
2. Click on the "Edit" button to make adjustments to the job settings.
3. Click on the "Delete" button to remove a command from the list of tasks.
4. Use the switch to enable / disable the command:
