Difference between revisions of "Server configuration"
From BrainyCP
| Line 1: | Line 1: | ||
| + | <pre data-placeholder="Перевод" dir="ltr" id="tw-target-text">To go to server settings, open the "Server settings" section of the admin panel. | ||
| − | + | The General tab displays all server settings. On the "Server" tab there are time, security and other settings. On the "Mail" tab there are mail settings.</pre> | |
| − | + | . | |
| + | <pre data-placeholder="Перевод" dir="ltr" id="tw-target-text">Server tab | ||
| + | The following settings are made on the "Server" tab: | ||
| + | 1. "Time" - setting the server time:</pre> | ||
| − | == | + | *To set up the date, press the button [[File:2020-10-22 15-42-12.png|border|2020-10-22 15-42-12.png]] in the field "Date and time", and choose it in the calendar. |
| + | *<pre data-placeholder="Перевод" dir="ltr" id="tw-target-text">To set the time, enter it in the appropriate windows using the keyboard, or set using the buttons[[File:2020-10-22 15-44-08.png|border|2020-10-22 15-44-08.png]]<span style="background-color: rgb(255, 255, 255); font-family: sans-serif, Arial, Verdana, " trebuchet="" ms";"="">. Then hit the "Change" button:</span></pre> | ||
| − | |||
| − | |||
| − | |||
| − | |||
[[File:2020-12-10 19-12-15.png|border|2020-12-10 19-12-15.png]] | [[File:2020-12-10 19-12-15.png|border|2020-12-10 19-12-15.png]] | ||
| − | * | + | *<pre data-placeholder="Перевод" dir="ltr" id="tw-target-text">To set a time zone, select it from the drop-down list in the "Time zone" field. Click on the "Change" button.</pre> |
| − | |||
| − | + | *<pre data-placeholder="Перевод" dir="ltr" id="tw-target-text">To synchronize with a temporary server, enable the "Synchronizing with temporary server" option:</pre> | |
| − | |||
| − | + | [[File:2020-12-10 19-15-43.png|border|2020-12-10 19-15-43.png]] | |
| − | |||
| − | |||
| − | |||
| − | + | 2. "Safety" - setting up the safety: | |
| − | * | + | *<pre data-placeholder="Перевод" dir="ltr" id="tw-target-text">To set a root password, enter a new password in the "Root-password" field. If the password is strong enough, a green line will appear below the input field. To generate a password, click on the button[[File:2020-10-22 16-15-37.png|border|2020-10-22 16-15-37.png]]<span style="background-color: rgb(255, 255, 255); font-family: sans-serif, Arial, Verdana, " trebuchet="" ms";"="">.</span></pre> |
| − | |||
| − | + | *<pre data-placeholder="Перевод" dir="ltr" id="tw-target-text">To open / close access to the panel for users with administrator rights enable / disable the option "Open / Close the access to panel for root user"</pre> | |
| + | . | ||
| + | *<pre data-placeholder="Перевод" dir="ltr" id="tw-target-text">To enable authorization by key, click on the "Generate key" button. This will open the "Public Key" and "Private Key" windows.</pre> | ||
| − | * | + | *<pre data-placeholder="Перевод" dir="ltr" id="tw-target-text">To view a list of all keys, click on the "Show list of keys" button. As a result, the "List of public keys" block will open:</pre> |
| − | |||
| − | |||
| − | |||
| − | + | [[File:2020-12-10 19-18-50.png|border|2020-12-10 19-18-50.png]] | |
| − | + | *<pre data-placeholder="Перевод" dir="ltr" id="tw-target-text">To open a public key, click on the "View" button opposite it. This will open the "Name of key file" window.</pre> | |
| − | + | *<pre data-placeholder="Перевод" dir="ltr" id="tw-target-text">To remove a key, click the "Delete" button. As a result, a dialog box will open, in which you will have an option to confirm / cancel the removal of the key:</pre> | |
| − | |||
| − | + | [[File:2020-12-10 19-36-34.png|border|2020-12-10 19-36-34.png]] | |
| − | + | *<pre data-placeholder="Перевод" dir="ltr" id="tw-target-text">To enable / disable htpasswd authorization, click on the "Enable" / "Disable" button in the "Authorization htpasswd" field. The authorization status is displayed to the left of the button.</pre> | |
| − | + | *<pre data-placeholder="Перевод" dir="ltr" id="tw-target-text">To set the maximum number of user processes to protect against fork bombs, specify a value in the "User processes" field. Click on the "Apply" button.</pre> | |
| − | + | *<pre data-placeholder="Перевод" dir="ltr" id="tw-target-text">To specify Forbidden / Allowed IP addresses for accessing the BrainyCP control panel, enter the addresses in the Forbidden IP / Allowed IP fields. Click on the "Apply" button below each changed field:</pre> | |
| − | |||
| − | + | [[File:2020-12-10 19-51-18.png|border|2020-12-10 19-51-18.png]] | |
| + | <pre data-placeholder="Перевод" dir="ltr" id="tw-target-text">To change the hostname, enter it in the "Hostname" field. Click on the "Change" button.</pre> | ||
| + | <pre data-placeholder="Перевод" dir="ltr" id="tw-target-text">To change the administrator's email address, enter it in the "Email of admin" field. Click on the "Change" button.</pre> | ||
| + | <pre data-placeholder="Перевод" dir="ltr" id="tw-target-text">To change the port, enter it in the "Port Brainy" field. Click on the "Change" button.</pre> | ||
| + | <pre data-placeholder="Перевод" dir="ltr" id="tw-target-text">To change the SSL port, enter it in the "Port Brainy SSL" field. Click on the "Change" button.</pre> | ||
| + | <pre data-placeholder="Перевод" dir="ltr" id="tw-target-text">To create a separate directory for users where the sites and log folders will be placed, enable the "Place users to Workspace" option:</pre> | ||
| − | + | [[File:2020-12-10 19-59-24.png|border|2020-12-10 19-59-24.png]] | |
| − | + | <pre data-placeholder="Перевод" dir="ltr" id="tw-target-text">3. "Other":</pre> | |
| − | + | <pre data-placeholder="Перевод" dir="ltr" id="tw-target-text">To update the panel's search index, click on the "Refresh panel search index" button.</pre> | |
| − | + | <pre data-placeholder="Перевод" dir="ltr" id="tw-target-text">To rebuild user quotas in the event of a system failure, click the "Refresh quota for users" button. This will open a confirmation dialog box for rebuilding quotas.</pre> | |
| − | + | <pre data-placeholder="Перевод" dir="ltr" id="tw-target-text">To change the language, select it from the drop-down list in the "Language" field. Click on the "Change" button.</pre> | |
| − | + | <pre data-placeholder="Перевод" dir="ltr" id="tw-target-text">To activate the creation of the index.html page when creating a new domain, enable the option "Create page index.html page while creating new domain".</pre> | |
| − | + | <pre data-placeholder="Перевод" dir="ltr" id="tw-target-text">To create a Denied User Name List, enter them in the "List of forbidden usernames" field. Click on the "Apply" button.</pre> | |
| + | <pre data-placeholder="Перевод" dir="ltr" id="tw-target-text">To upload a logo, click on the "Choose File" button in the "Loading logotype" field.</pre> | ||
| + | <pre data-placeholder="Перевод" dir="ltr" id="tw-target-text">To change a template, select it from the drop-down list in the "Template" field. Click on the "Change" button:</pre> | ||
[[File:2020-12-10 20-04-59.png|border|2020-12-10 20-04-59.png]] | [[File:2020-12-10 20-04-59.png|border|2020-12-10 20-04-59.png]] | ||
| − | == | + | == Tab "Mail" == |
| + | <pre data-placeholder="Перевод" dir="ltr" id="tw-target-text">The following settings are made on the "Mail" tab:</pre> | ||
| + | <pre data-placeholder="Перевод" dir="ltr" id="tw-target-text">1. "Mail". To select an option for sending mail, select phpmail or smtp in the drop-down list in the "Sending mails" field.</pre> | ||
| + | <pre data-placeholder="Перевод" dir="ltr" id="tw-target-text">2. "Headers". To customize headers, fill in the fields "From email", "From your name", "Reply to email", "Respond to your name", "Encoding". Click on the "Apply" button.</pre> | ||
| − | + | <br/> 3. "Test sending ". To perform a test sending, enter your email address in the" Your email " field. Click on the "Send" button: | |
[[File:2020-12-10 20-17-10.png|border|2020-12-10 20-17-10.png]] | [[File:2020-12-10 20-17-10.png|border|2020-12-10 20-17-10.png]] | ||
Revision as of 20:50, 29 March 2021
To go to server settings, open the "Server settings" section of the admin panel.

The General tab displays all server settings. On the "Server" tab there are time, security and other settings. On the "Mail" tab there are mail settings.
.
Server tab
The following settings are made on the "Server" tab:
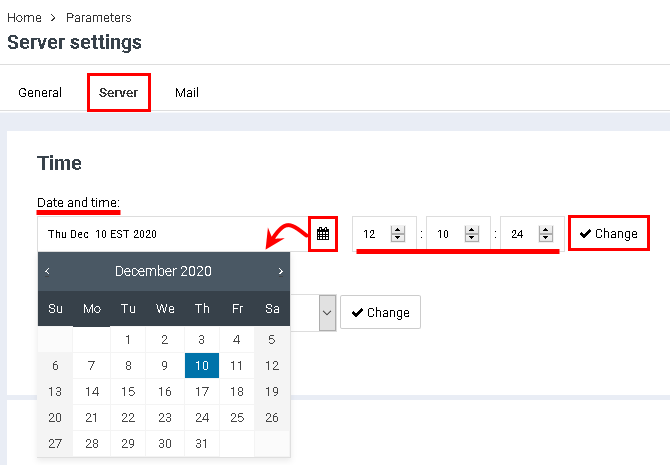
1. "Time" - setting the server time:
- To set up the date, press the button
 in the field "Date and time", and choose it in the calendar.
 To set the time, enter it in the appropriate windows using the keyboard, or set using the buttons[[File:2020-10-22 15-44-08.png|border|2020-10-22 15-44-08.png]]<span style="background-color: rgb(255, 255, 255); font-family: sans-serif, Arial, Verdana, " trebuchet="" ms";"="">. Then hit the "Change" button:</span>
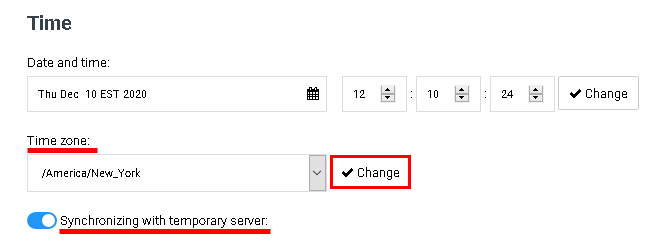
To set a time zone, select it from the drop-down list in the "Time zone" field. Click on the "Change" button.
To synchronize with a temporary server, enable the "Synchronizing with temporary server" option:
2. "Safety" - setting up the safety:
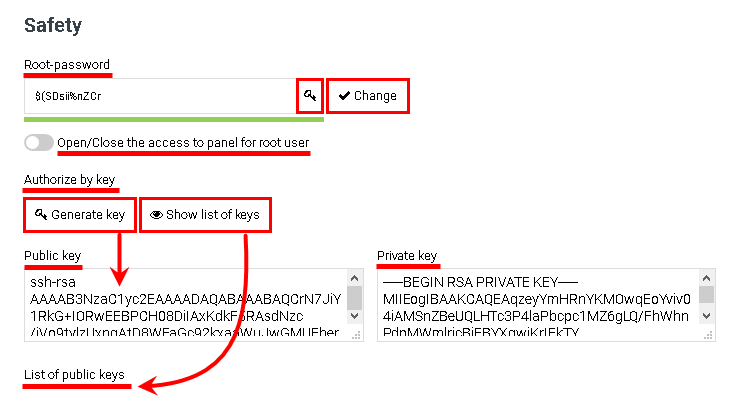
To set a root password, enter a new password in the "Root-password" field. If the password is strong enough, a green line will appear below the input field. To generate a password, click on the button[[File:2020-10-22 16-15-37.png|border|2020-10-22 16-15-37.png]]<span style="background-color: rgb(255, 255, 255); font-family: sans-serif, Arial, Verdana, " trebuchet="" ms";"="">.</span>
To open / close access to the panel for users with administrator rights enable / disable the option "Open / Close the access to panel for root user"
.
To enable authorization by key, click on the "Generate key" button. This will open the "Public Key" and "Private Key" windows.
To view a list of all keys, click on the "Show list of keys" button. As a result, the "List of public keys" block will open:
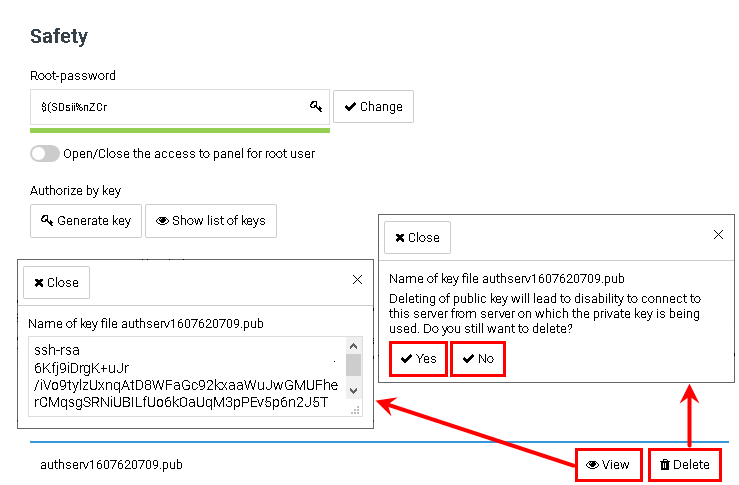
To open a public key, click on the "View" button opposite it. This will open the "Name of key file" window.
To remove a key, click the "Delete" button. As a result, a dialog box will open, in which you will have an option to confirm / cancel the removal of the key:
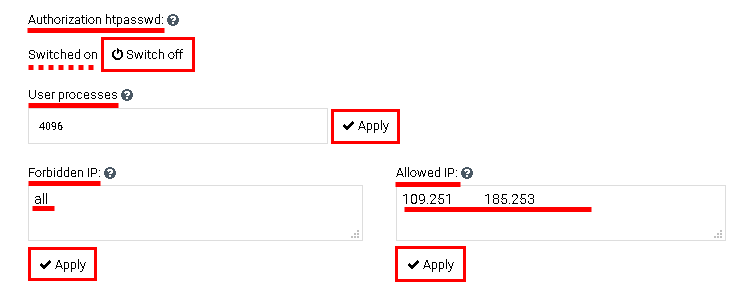
To enable / disable htpasswd authorization, click on the "Enable" / "Disable" button in the "Authorization htpasswd" field. The authorization status is displayed to the left of the button.
To set the maximum number of user processes to protect against fork bombs, specify a value in the "User processes" field. Click on the "Apply" button.
To specify Forbidden / Allowed IP addresses for accessing the BrainyCP control panel, enter the addresses in the Forbidden IP / Allowed IP fields. Click on the "Apply" button below each changed field:
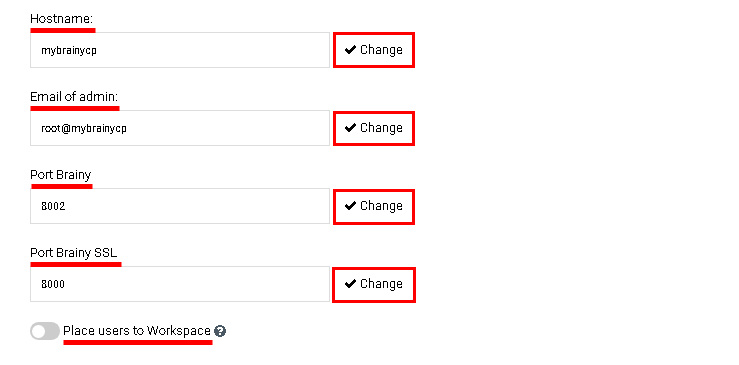
To change the hostname, enter it in the "Hostname" field. Click on the "Change" button.
To change the administrator's email address, enter it in the "Email of admin" field. Click on the "Change" button.
To change the port, enter it in the "Port Brainy" field. Click on the "Change" button.
To change the SSL port, enter it in the "Port Brainy SSL" field. Click on the "Change" button.
To create a separate directory for users where the sites and log folders will be placed, enable the "Place users to Workspace" option:
3. "Other":
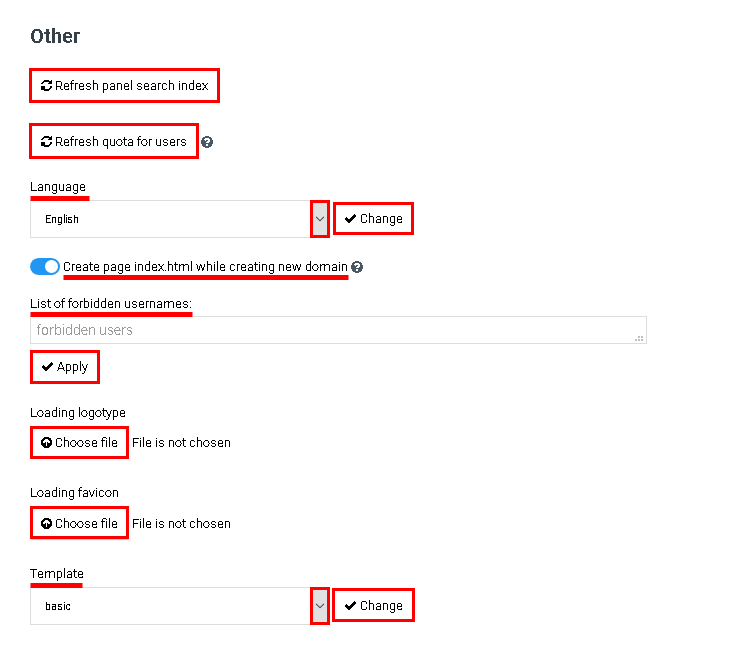
To update the panel's search index, click on the "Refresh panel search index" button.
To rebuild user quotas in the event of a system failure, click the "Refresh quota for users" button. This will open a confirmation dialog box for rebuilding quotas.
To change the language, select it from the drop-down list in the "Language" field. Click on the "Change" button.
To activate the creation of the index.html page when creating a new domain, enable the option "Create page index.html page while creating new domain".
To create a Denied User Name List, enter them in the "List of forbidden usernames" field. Click on the "Apply" button.
To upload a logo, click on the "Choose File" button in the "Loading logotype" field.
To change a template, select it from the drop-down list in the "Template" field. Click on the "Change" button:
Tab "Mail"
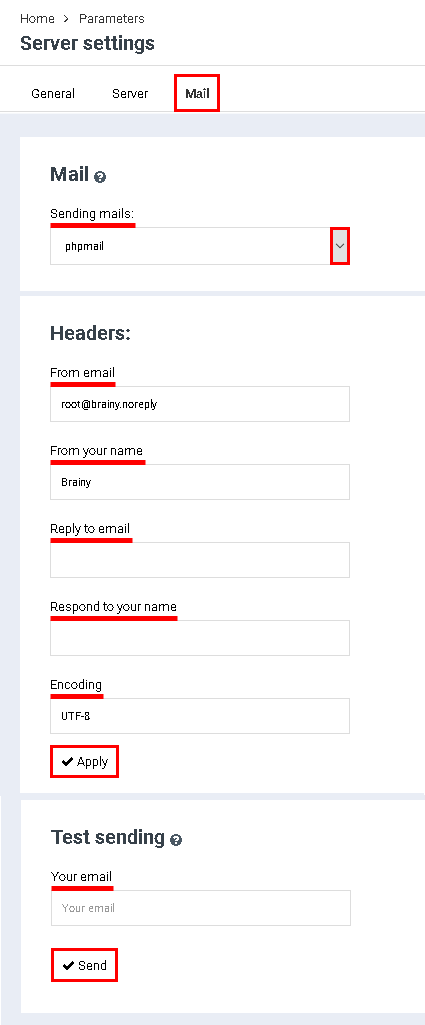
The following settings are made on the "Mail" tab:
1. "Mail". To select an option for sending mail, select phpmail or smtp in the drop-down list in the "Sending mails" field.
2. "Headers". To customize headers, fill in the fields "From email", "From your name", "Reply to email", "Respond to your name", "Encoding". Click on the "Apply" button.
3. "Test sending ". To perform a test sending, enter your email address in the" Your email " field. Click on the "Send" button:
