Difference between revisions of "Monitoring of connects"
From BrainyCP
| Line 1: | Line 1: | ||
| − | < | + | <div data-placeholder="Перевод" dir="ltr">To monitor connections in the BrainyCP control panel, go to the "Network" / "Monitor Connections" section.<br/> </div> <div data-placeholder="Перевод" dir="ltr">The "Total number of connections" field shows the number of active connections. To open a list of all current connections, click on the "Show IP List" button:<br/> </div> <div data-placeholder="Перевод" dir="ltr" id="tw-target-text">1. To block the connection, click on the "Block IP via iptables" button.<br/> 2.To configure automatic IP blocking based on the number of connections, specify the maximum number of allowed 3.connections in the Block all IPs with more connections field.<br/> 4. To configure automatic IP blocking based on the time the script runs, specify the maximum time the script runs in 5. the "Script run time" field.<br/> 6. To enable logging, check the "Enable logging" box.<br/> </div> <div data-placeholder="Перевод" dir="ltr" id="tw-target-text">To apply the settings, click on the "Launch once" button. To apply the timer settings, click on the "Start by timer" button.<br/> As a result, the data will be displayed in the log. Click on the "Open Journal" button to open the journal. Click on the "Refresh Log Information" button to refresh the data:</div> <p style="text-align: justify">[[File:2020-12-24 14-04-50.png|border|2020-12-24 14-04-50.png]]</p> <p style="text-align: justify"> </p> |
| − | |||
| − | |||
| − | |||
| − | |||
| − | |||
Revision as of 23:01, 8 April 2021
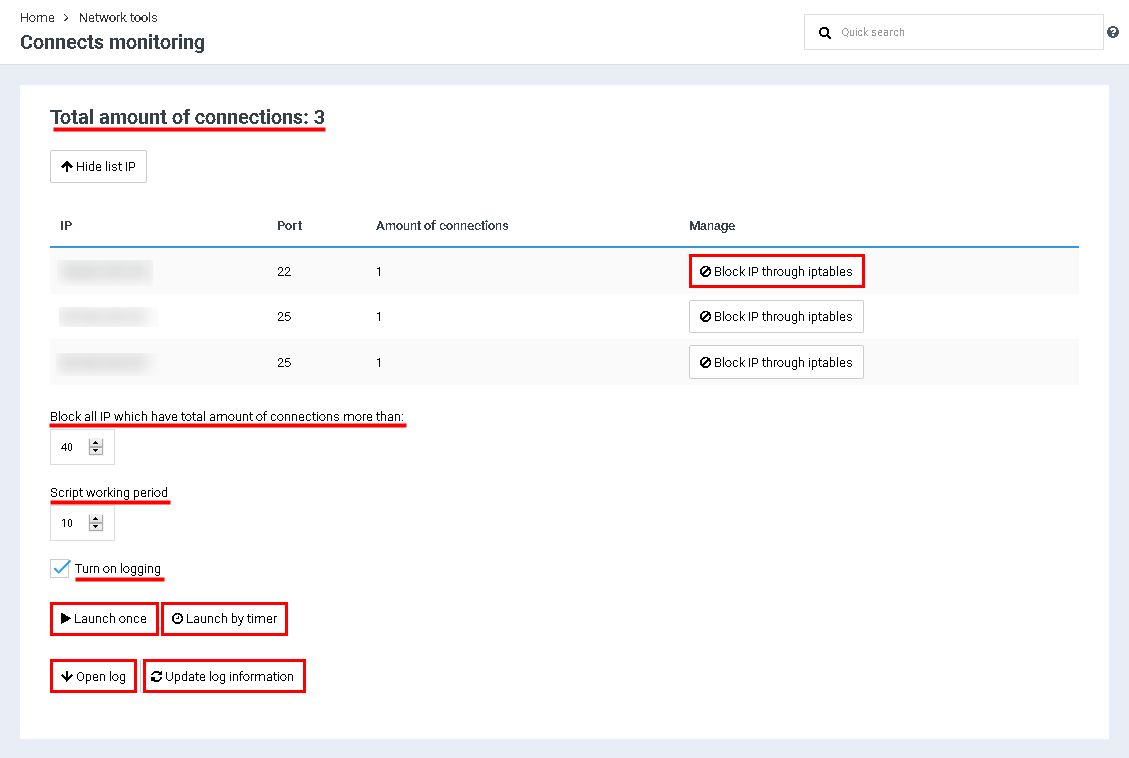
To monitor connections in the BrainyCP control panel, go to the "Network" / "Monitor Connections" section.
The "Total number of connections" field shows the number of active connections. To open a list of all current connections, click on the "Show IP List" button:
1. To block the connection, click on the "Block IP via iptables" button.
2.To configure automatic IP blocking based on the number of connections, specify the maximum number of allowed 3.connections in the Block all IPs with more connections field.
4. To configure automatic IP blocking based on the time the script runs, specify the maximum time the script runs in 5. the "Script run time" field.
6. To enable logging, check the "Enable logging" box.
To apply the settings, click on the "Launch once" button. To apply the timer settings, click on the "Start by timer" button.
As a result, the data will be displayed in the log. Click on the "Open Journal" button to open the journal. Click on the "Refresh Log Information" button to refresh the data:
As a result, the data will be displayed in the log. Click on the "Open Journal" button to open the journal. Click on the "Refresh Log Information" button to refresh the data:
