Difference between revisions of "Manage SSL-certificates"
From BrainyCP
| Line 1: | Line 1: | ||
| − | < | + | <div data-placeholder="Перевод" dir="ltr">To install the Let's Encrypt SSL certificate, go to "Certificates" / "SSL Management."</div> <div data-placeholder="Перевод" dir="ltr">In the SSL / TLS Management section, go to the Certificate Installation tab:<br/> </div> <div data-placeholder="Перевод" dir="ltr" id="tw-target-text">1. Select a domain from the drop-down list (if there are several of them on the same host account).<br/> 2. Click on the "Install Lets Encrypt Certificate" button:</div> <p style="text-align: justify">[[File:2020-12-24 13-18-18.png|border|2020-12-24 13-18-18.png]]</p> <div data-placeholder="Перевод" dir="ltr">After that, an automatic transition to the "List of domains and certificates" tab will be performed. Here you need to do the following:</div> <div data-placeholder="Перевод" dir="ltr">1. In the "Certificate" field, select "Generate Certificate" from the drop-down list.<br/> 2. Check the box "Install certificate for email" if you want to generate a certificate for mail.<br/> 3. Check the box "Auto renew of certificate" if you want the certificate to be renewed automatically.</div> <p style="text-align: justify">Нажмите на кнопку "Сохранить":</p> <p style="text-align: justify">[[File:2020-12-24 13-21-03.png|border|2020-12-24 13-21-03.png]]</p> <div data-placeholder="Перевод" dir="ltr" id="tw-target-text">Wait for the key creation process to complete. If everything is done correctly, you will see a message about the successful installation of the SSL certificate. To check if the certificate works, open the site in a browser (remember to include https: //, not http: // in front of the domain). If the installation was successful, a lock will appear in the address bar next to the domain, indicating the presence of a certificate:</div> <p style="text-align: justify">[[File:2019-08-22 15-39-09.png|border|2019-08-22 15-39-09.png]]</p> <div data-placeholder="Перевод" dir="ltr">To set up a redirect from http to https after installing the SSL certificate, go to the "Web Server Management" / "http forwarding" section:</div> <div data-placeholder="Перевод" dir="ltr">1. In the "Site" field, select a domain from the drop-down list.<br/> 2. In the "Forwarding Type" field, select "http to https" from the drop-down list.<br/> 3. Click on the "Add" button:</div> <p style="text-align: justify">[[File:2020-12-20 0-08-06.png|border|2020-12-20 0-08-06.png]]</p> |
| − | |||
| − | |||
| − | <p style="text-align: justify">[[File:2020-12-24 13-18-18.png|border]] | ||
| − | |||
| − | |||
| − | |||
| − | <p style="text-align: justify">Нажмите на кнопку "Сохранить":</p> <p style="text-align: justify">[[File:2020-12-24 13-21-03.png|border]]</p> < | ||
| − | |||
| − | |||
| − | |||
| − | <p style="text-align: justify">[[File:2020-12-20 0-08-06.png|border]]</p> | ||
Revision as of 22:57, 8 April 2021
To install the Let's Encrypt SSL certificate, go to "Certificates" / "SSL Management."
In the SSL / TLS Management section, go to the Certificate Installation tab:
1. Select a domain from the drop-down list (if there are several of them on the same host account).
2. Click on the "Install Lets Encrypt Certificate" button:
2. Click on the "Install Lets Encrypt Certificate" button:
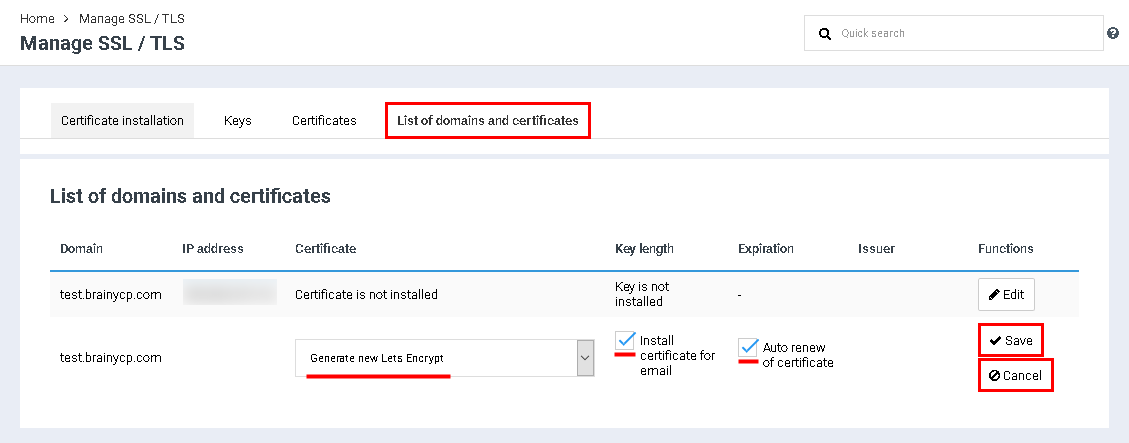
After that, an automatic transition to the "List of domains and certificates" tab will be performed. Here you need to do the following:
1. In the "Certificate" field, select "Generate Certificate" from the drop-down list.
2. Check the box "Install certificate for email" if you want to generate a certificate for mail.
3. Check the box "Auto renew of certificate" if you want the certificate to be renewed automatically.
2. Check the box "Install certificate for email" if you want to generate a certificate for mail.
3. Check the box "Auto renew of certificate" if you want the certificate to be renewed automatically.
Нажмите на кнопку "Сохранить":
Wait for the key creation process to complete. If everything is done correctly, you will see a message about the successful installation of the SSL certificate. To check if the certificate works, open the site in a browser (remember to include https: //, not http: // in front of the domain). If the installation was successful, a lock will appear in the address bar next to the domain, indicating the presence of a certificate:
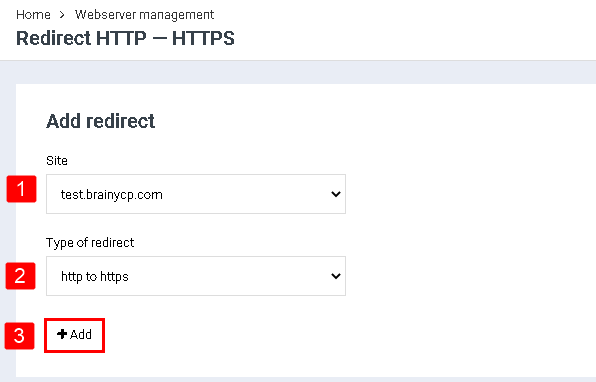
To set up a redirect from http to https after installing the SSL certificate, go to the "Web Server Management" / "http forwarding" section:
1. In the "Site" field, select a domain from the drop-down list.
2. In the "Forwarding Type" field, select "http to https" from the drop-down list.
3. Click on the "Add" button:
2. In the "Forwarding Type" field, select "http to https" from the drop-down list.
3. Click on the "Add" button:


