Difference between revisions of "Creating a group of host-accounts"
From BrainyCP
| Line 1: | Line 1: | ||
| − | < | + | <pre data-placeholder="Перевод" dir="ltr" id="tw-target-text">To create a group of host accounts, go to the "Group editor" / "Current group" section of the control panel.</pre> |
| − | + | <pre data-placeholder="Перевод" dir="ltr" id="tw-target-text">After a group of host accounts has been added, it can be selected when creating host accounts (see the article "Creating a host account in BrainyCP") - all restrictions for this group are applied automatically.</pre> | |
| + | <pre data-placeholder="Перевод" dir="ltr" id="tw-target-text">Select "Create New" in the "Current Group" field. Enter the name of the group in the "Name of new group" field:</pre> | ||
| + | <p style="text-align: justify">[[File:2020-12-14 20-03-51.png|border|2020-12-14 20-03-51.png]]</p> <pre data-placeholder="Перевод" dir="ltr" id="tw-target-text">The next step is to configure the parameters. The block with parameters is divided into two tabs: administrator and user. Parameters can be turned on and off by selecting the desired item from the drop-down list.</pre> | ||
| + | <pre data-placeholder="Перевод" dir="ltr" id="tw-target-text">Configure all the required settings for the new host account group on the "Admin Parameters" tab and the Custom tab. Click on the "Create" button:</pre> | ||
| − | + | [[File:2020-12-14 20-06-16.png|border|2020-12-14 20-06-16.png]] | |
| + | <pre data-placeholder="Перевод" dir="ltr" id="tw-target-text">When saving a new group of host accounts, it will be added in the "Current group" block. To edit a group, select it from the drop-down list.</pre> | ||
| + | <pre data-placeholder="Перевод" dir="ltr" id="tw-target-text">If necessary, you can change the name of the host account group, and change the settings on the "Admin parameters" and "Custom Settings" tabs. After editing the group, click on the "Save" button.</pre> | ||
| − | [[File:2020-12-14 20- | + | [[File:2020-12-14 20-08-39.png|border|2020-12-14 20-08-39.png]] |
| − | |||
| − | |||
| − | |||
| − | |||
| − | |||
| − | |||
Revision as of 21:24, 31 March 2021
To create a group of host accounts, go to the "Group editor" / "Current group" section of the control panel.
After a group of host accounts has been added, it can be selected when creating host accounts (see the article "Creating a host account in BrainyCP") - all restrictions for this group are applied automatically.
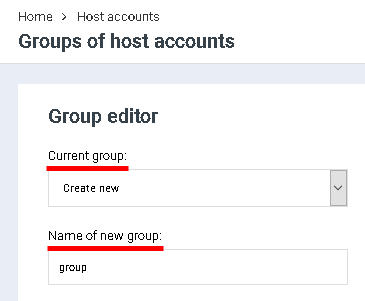
Select "Create New" in the "Current Group" field. Enter the name of the group in the "Name of new group" field:
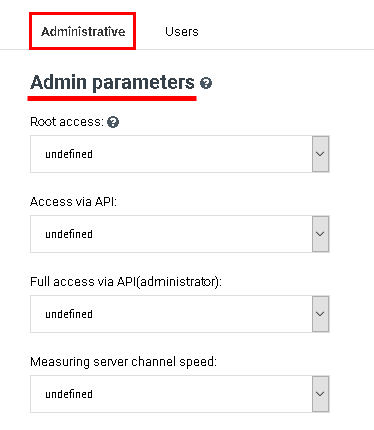
The next step is to configure the parameters. The block with parameters is divided into two tabs: administrator and user. Parameters can be turned on and off by selecting the desired item from the drop-down list.
Configure all the required settings for the new host account group on the "Admin Parameters" tab and the Custom tab. Click on the "Create" button:
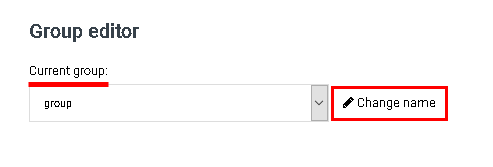
When saving a new group of host accounts, it will be added in the "Current group" block. To edit a group, select it from the drop-down list.
If necessary, you can change the name of the host account group, and change the settings on the "Admin parameters" and "Custom Settings" tabs. After editing the group, click on the "Save" button.


