Difference between revisions of "Configure backups"
From BrainyCP
m (Protected "Configure backups" ([Edit=Allow only administrators] (indefinite) [Move=Allow only administrators] (indefinite))) |
|||
| (2 intermediate revisions by one other user not shown) | |||
| Line 1: | Line 1: | ||
| + | <div data-placeholder="Перевод" dir="ltr">To configure site backups, go to the "Backup" / "Configure backups" section of the control panel.<br/> </div> <div data-placeholder="Перевод" dir="ltr">Section "Backup" / "Configuring backups" consists of several tabs:<br/> </div> | ||
| + | *On the "Manage Tasks" tab, you can configure the rules and frequency of creating a backup. | ||
| + | *All backups are collected on the "List of backups" tab. | ||
| + | *The Restore from Archive tab restores the saved version of their archived sites. | ||
| + | *The "Recovery history" tab contains the entire history of restoring backups. | ||
| + | *The "Backup history" tab contains the entire backup history. | ||
| − | + | == Manage Tasks == | |
| − | + | <div data-placeholder="Перевод" dir="ltr" id="tw-target-text">Tasks created for backup are displayed in the "Task List" block (Index 1):</div> | |
| − | + | *<div data-placeholder="Перевод" dir="ltr" id="tw-target-text">To start the task right now, click on the button[[File:2019-11-10 15-40-38.png|border|2019-11-10 15-40-38.png]]<span style="background-color: rgb(255, 255, 255); font-family: sans-serif, Arial, Verdana, " trebuchet="" ms";"="">, </span>after which the backup will be available on the "Backup history" tab.</div> | |
| − | + | *<div data-placeholder="Перевод" dir="ltr" id="tw-target-text">To edit a task, click on the button [[File:2019-11-10 15-42-12.png|border|2019-11-10 15-42-12.png]]<span style="background-color: rgb(255, 255, 255); font-family: sans-serif, Arial, Verdana, " trebuchet="" ms";"="">.</span></div> | |
| − | * | + | *<div data-placeholder="Перевод" dir="ltr" id="tw-target-text">To delete a task, click the button[[File:2019-11-10 15-42-48.png|border|2019-11-10 15-42-48.png]]<span style="background-color: rgb(255, 255, 255); font-family: sans-serif, Arial, Verdana, " trebuchet="" ms";"="">.</span></div> |
| − | + | <div data-placeholder="Перевод" dir="ltr" id="tw-target-text">To create a backup task, follow these steps (Pointer 2):<br/> </div> <div data-placeholder="Перевод" dir="ltr" id="tw-target-text">1. Check the "Create backups for all users" checkbox to create backups for all users.<br/> 2. Click on the usernames in the User List field to back up the selected users.<br/> 3. Check the "Selective backup" box to select services for backup<br/> 4. Enter a name for the job in the Job Name field, or leave the default name (backupjob_date_time).<br/> 5. Select from the drop-down list the type "Storage type" the storage location for backups:<br/> </div> | |
| − | + | *"Local directory" - specify the path to the local directory in the "Path for local backup" field. | |
| − | + | *"Remote server" - enter the IP address in the "Server IP for remote backup" field. | |
| − | + | *"FTP" - enter the IP address in the "Server IP for remote backup" field and click on the "Test connection" button. | |
| − | + | *"Yandex disk" - click on the "Check connection" button, specify the token and the path to the directory in the "Token" and "Folder on the remote server" fields. | |
| − | + | *"Google Drive" – click on the "Test connection" button, specify the path to the directory in the "Folder on the remote server" field. | |
| − | + | *"GDrive" – press the button "Test connection", fill in the fields "ID", "Secret key" and "Folder on the remote server". | |
| − | + | *"DropBox" – click on the "Test connection" button, specify the path to the directory in the "Folder on the remote server" field. | |
| − | + | <div data-placeholder="Перевод" dir="ltr">6. Select a compression format from the drop-down list.<br/> 7. Select the frequency of the backup.<br/> 8. Select the start time for the backup.<br/> 9. Select the compression level.<br/> 10. Specify the number of copies.<br/> 11. Check the "Encrypt backup" checkbox to enable encryption and enter the password.<br/> 12. Check the box next to "Send e-mail after completion" and enter the email address to which the notification will be sent when the backup is complete.<br/> 13. Check the "Disallow writing to backups" checkbox to prevent users from editing files in the backup.<br/> 14. Select the Active checkbox to make the created task active.</div> <div data-placeholder="Перевод" dir="ltr">Click on the "Add task" button to complete the task creation:</div> | |
| − | + | [[File:2020-12-24 13-35-47.png|border|2020-12-24 13-35-47.png]] | |
| − | * | + | <div data-placeholder="Перевод" dir="ltr" id="tw-target-text"> |
| − | * | + | == Restoring a backup == |
| − | + | <div data-placeholder="Перевод" dir="ltr" id="tw-target-text">To restore a backup, go to the "Restore from archive" tab and select one of the options:<br/> <br/> 1. Select the archive on your PC and click on the "Start recovery" button.<br/> 2. Specify the full local path to the archive and click the "Start recovery" button.<br/> 3. Specify the link to the archive and click on the "Start recovery" button.<br/> 4. Specify FTP access in the format ftp: // login: password@ftp.example.org/some_file and click the "Start recovery" button.</div> </div> | |
| − | + | [[File:2020-12-24 13-42-59.png|border|2020-12-24 13-42-59.png]] | |
| − | |||
| − | 1. | ||
| − | |||
| − | *" | ||
| − | *" | ||
| − | *"FTP" | ||
| − | *" | ||
| − | *"Google Drive" – | ||
| − | *"GDrive" – | ||
| − | *"DropBox" – | ||
| − | |||
| − | 6. | ||
| − | |||
| − | |||
| − | |||
| − | [[File:2020-12-24 13-35-47.png|border]] | ||
| − | |||
| − | == | ||
| − | |||
| − | |||
| − | |||
| − | |||
| − | |||
| − | |||
| − | |||
| − | |||
| − | [[File:2020-12-24 13-42-59.png|border]] | ||
Latest revision as of 12:49, 26 July 2021
To configure site backups, go to the "Backup" / "Configure backups" section of the control panel.
Section "Backup" / "Configuring backups" consists of several tabs:
- On the "Manage Tasks" tab, you can configure the rules and frequency of creating a backup.
- All backups are collected on the "List of backups" tab.
- The Restore from Archive tab restores the saved version of their archived sites.
- The "Recovery history" tab contains the entire history of restoring backups.
- The "Backup history" tab contains the entire backup history.
Manage Tasks
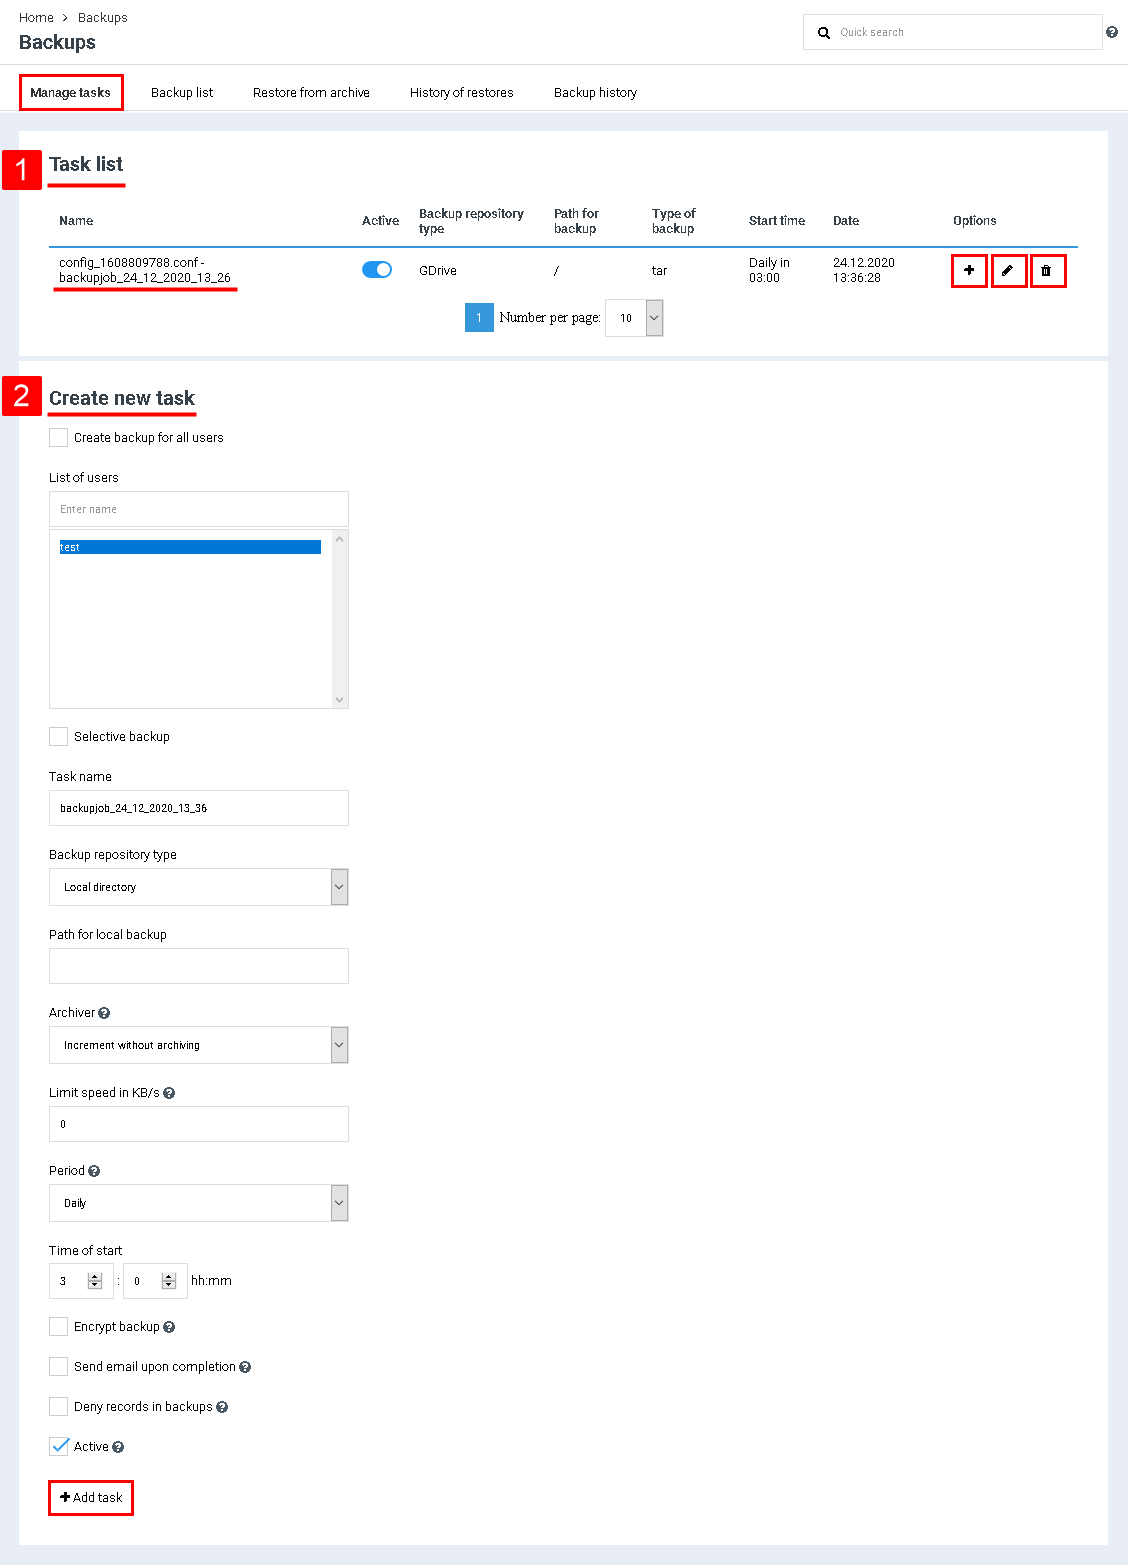
Tasks created for backup are displayed in the "Task List" block (Index 1):
To create a backup task, follow these steps (Pointer 2):
1. Check the "Create backups for all users" checkbox to create backups for all users.
2. Click on the usernames in the User List field to back up the selected users.
3. Check the "Selective backup" box to select services for backup
4. Enter a name for the job in the Job Name field, or leave the default name (backupjob_date_time).
5. Select from the drop-down list the type "Storage type" the storage location for backups:
- "Local directory" - specify the path to the local directory in the "Path for local backup" field.
- "Remote server" - enter the IP address in the "Server IP for remote backup" field.
- "FTP" - enter the IP address in the "Server IP for remote backup" field and click on the "Test connection" button.
- "Yandex disk" - click on the "Check connection" button, specify the token and the path to the directory in the "Token" and "Folder on the remote server" fields.
- "Google Drive" – click on the "Test connection" button, specify the path to the directory in the "Folder on the remote server" field.
- "GDrive" – press the button "Test connection", fill in the fields "ID", "Secret key" and "Folder on the remote server".
- "DropBox" – click on the "Test connection" button, specify the path to the directory in the "Folder on the remote server" field.
6. Select a compression format from the drop-down list.
7. Select the frequency of the backup.
8. Select the start time for the backup.
9. Select the compression level.
10. Specify the number of copies.
11. Check the "Encrypt backup" checkbox to enable encryption and enter the password.
12. Check the box next to "Send e-mail after completion" and enter the email address to which the notification will be sent when the backup is complete.
13. Check the "Disallow writing to backups" checkbox to prevent users from editing files in the backup.
14. Select the Active checkbox to make the created task active.
Click on the "Add task" button to complete the task creation:
Restoring a backup
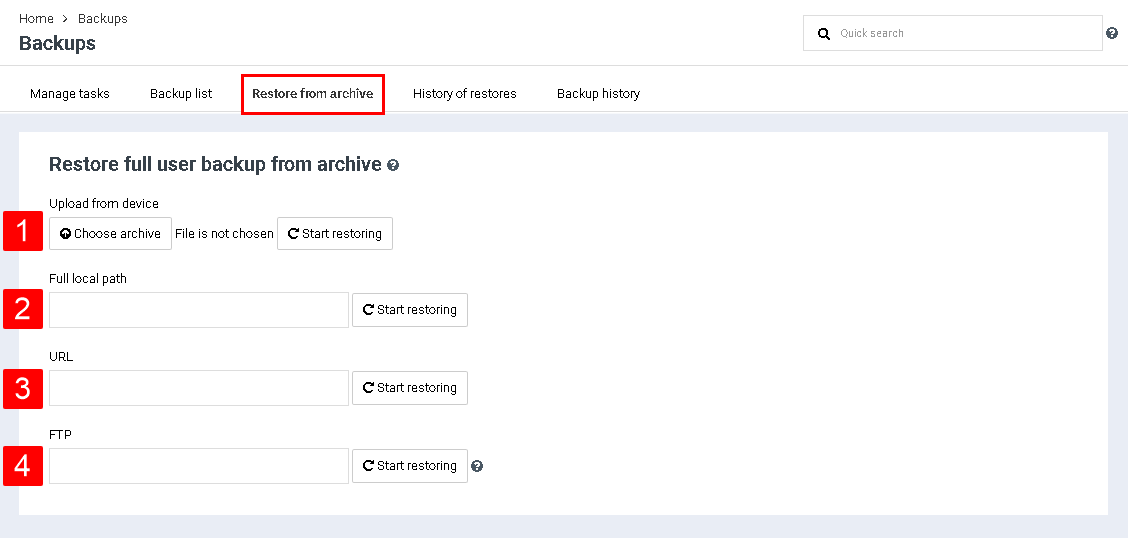
To restore a backup, go to the "Restore from archive" tab and select one of the options:
1. Select the archive on your PC and click on the "Start recovery" button.
2. Specify the full local path to the archive and click the "Start recovery" button.
3. Specify the link to the archive and click on the "Start recovery" button.
4. Specify FTP access in the format ftp: // login: password@ftp.example.org/some_file and click the "Start recovery" button.

