Difference between revisions of "Manage service certificates"
From BrainyCP
(Новая страница: « Чтобы настроить сертификаты сервисов в панелиу правления BrainyCP, перейдите в раздел "Серт…») |
m (Protected "Manage service certificates" ([Edit=Allow only administrators] (indefinite) [Move=Allow only administrators] (indefinite))) |
||
| (4 intermediate revisions by one other user not shown) | |||
| Line 1: | Line 1: | ||
| + | <div data-placeholder="Перевод" dir="ltr">To configure service certificates in the BrainyCP dashboard, go to SSL Certificates / Service Certificates.<br/> </div> <div data-placeholder="Перевод" dir="ltr">The "List of Certificates" section contains the following information (Index1):<br/> </div> | ||
| + | *"Services" is the name of the service. | ||
| + | *"Domains" is the domain where the service is hosted. | ||
| + | *"Expiration" - the validity period of the current certificate. | ||
| + | *"Key size" - the size of the certificate key. | ||
| + | *"Issuer" is the issuer of the certificate. | ||
| + | *"Actions" - actions performed on the certificate: | ||
| − | + | To apply an existing certificate for the selected service, click on the "Apply existing certificate" button. As a result, a drop-down list will open in which you need to select a service. Click on the "Save" button to save your changes. | |
| − | + | <div data-placeholder="Перевод" dir="ltr">To delete a certificate, click on the "Delete Certificate" button.<br/> To view the certificate, click on the "View Certificate" button.</div> <div data-placeholder="Перевод" dir="ltr">To install a new certificate for the selected service, click on the "Install new certificate" button.<br/> As a result, the "Generate Certificate" block will be pulled up (Index 2):</div> <div data-placeholder="Перевод" dir="ltr"> </div> <div data-placeholder="Перевод" dir="ltr">1. Check the box for one or more services for which the certificate will be generated.<br/> <br/> 2. To generate a certificate, click on the "Generate Certificate" button. To generate a Lets Encrypt certificate, click on the "Generate Lets Encrypt" button.<br/> </div> <div data-placeholder="Перевод" dir="ltr" id="tw-target-text">Upon completion of certificate creation, the key size and certificate validity period will be displayed. Click on the "Install" button:</div> | |
| − | + | [[File:2020-12-24 13-09-55.png|border|2020-12-24 13-09-55.png]] | |
| − | |||
| − | |||
| − | |||
| − | |||
| − | |||
| − | |||
| − | |||
| − | |||
| − | |||
| − | |||
| − | |||
| − | |||
| − | |||
| − | |||
| − | [[File:2020- | ||
| − | |||
| − | |||
| − | |||
| − | |||
Latest revision as of 12:49, 26 July 2021
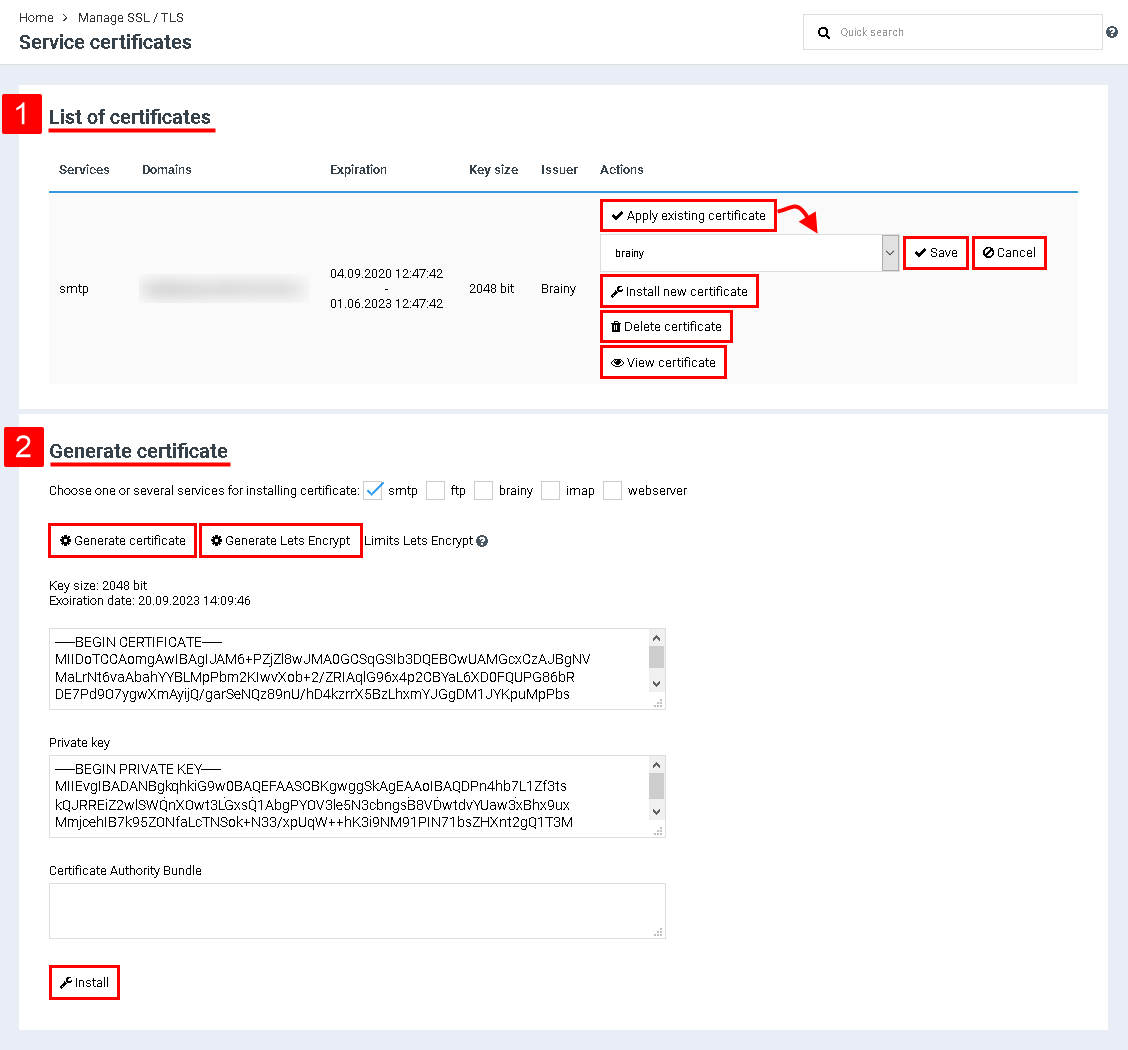
To configure service certificates in the BrainyCP dashboard, go to SSL Certificates / Service Certificates.
The "List of Certificates" section contains the following information (Index1):
- "Services" is the name of the service.
- "Domains" is the domain where the service is hosted.
- "Expiration" - the validity period of the current certificate.
- "Key size" - the size of the certificate key.
- "Issuer" is the issuer of the certificate.
- "Actions" - actions performed on the certificate:
To apply an existing certificate for the selected service, click on the "Apply existing certificate" button. As a result, a drop-down list will open in which you need to select a service. Click on the "Save" button to save your changes.
To delete a certificate, click on the "Delete Certificate" button.
To view the certificate, click on the "View Certificate" button.
To view the certificate, click on the "View Certificate" button.
To install a new certificate for the selected service, click on the "Install new certificate" button.
As a result, the "Generate Certificate" block will be pulled up (Index 2):
As a result, the "Generate Certificate" block will be pulled up (Index 2):
1. Check the box for one or more services for which the certificate will be generated.
2. To generate a certificate, click on the "Generate Certificate" button. To generate a Lets Encrypt certificate, click on the "Generate Lets Encrypt" button.
2. To generate a certificate, click on the "Generate Certificate" button. To generate a Lets Encrypt certificate, click on the "Generate Lets Encrypt" button.
Upon completion of certificate creation, the key size and certificate validity period will be displayed. Click on the "Install" button:
