Difference between revisions of "Creating host-account"
From BrainyCP
m (Protected "Creating host-account" ([Edit=Allow only administrators] (indefinite) [Move=Allow only administrators] (indefinite))) |
|||
| (4 intermediate revisions by one other user not shown) | |||
| Line 1: | Line 1: | ||
| − | < | + | <pre data-placeholder="Перевод" dir="ltr" id="tw-target-text">Host accounts are created and edited in the "All host accounts" section of the control panel. In the "Host account list" section, a list of all created host accounts is displayed. When you click on the "Edit" button, a form for correcting data in the account will open - the fields in it are identical to the fields filled in when registering a new host account. Clicking on the "Delete" button will delete the host account. By clicking on the "Sign in" button, the administrator will be asked to log in to the user account:</pre> |
| − | + | <p style="text-align: justify">[[File:2020-12-10 19-05-05.png|border|2020-12-10 19-05-05.png]]</p> <p style="text-align: justify">To create a new host-account fill in the following fields:</p> <p style="text-align: justify">1. "Username": enter the username (login) in Latin letters.</p> <pre data-placeholder="Перевод" dir="ltr" id="tw-target-text">2. "Password": enter a password or click on the "Generate password" button to generate a code.</pre> | |
| − | + | <pre data-placeholder="Перевод" dir="ltr" id="tw-target-text">3. "IP address": the field is filled in automatically.</pre> | |
| − | + | <pre data-placeholder="Перевод" dir="ltr" id="tw-target-text">4. "Group": Select from the drop-down list the group to which this host account belongs.</pre> | |
| − | + | <pre data-placeholder="Перевод" dir="ltr" id="tw-target-text">5. "Subscription plan": select from the drop-down list the rate according to which the owner of the host account pays for the services.</pre> | |
| − | + | <pre data-placeholder="Перевод" dir="ltr" id="tw-target-text">6. "Language": select the language of the user-side panel interface from the drop-down list.</pre> | |
| − | + | <pre data-placeholder="Перевод" dir="ltr" id="tw-target-text">7. "Number of emails": set a limit on the number of mail accounts (0 - unlimited).</pre> | |
| − | + | ||
| − | + | 8. Traffic": set a traffic limit (0 - unlimited). | |
| − | + | ||
| − | + | 9."Number of websites": set a limit on the number of sites on this host account (0 - unlimited). | |
| − | + | <pre data-placeholder="Перевод" dir="ltr" id="tw-target-text">10. "MySQL base": set a limit on the number of databases (0 - unlimited).</pre> | |
| − | + | <pre data-placeholder="Перевод" dir="ltr" id="tw-target-text">11. "Amount of DNS zones": set a limit on the number of DNS zones (0 - unlimited).</pre> | |
| − | + | <pre data-placeholder="Перевод" dir="ltr" id="tw-target-text">12. "Disc space": set the disk quota (0 - unlimited).</pre> | |
| − | + | <pre data-placeholder="Перевод" dir="ltr" id="tw-target-text">13. "FTP accounts": set a limit on the number of FTP accounts (0 - unlimited).</pre> | |
| − | + | <pre data-placeholder="Перевод" dir="ltr" id="tw-target-text">14. "Shell access": select from the drop-down list "n" to disable shell access, or "y" to enable shell access.</pre> | |
| − | <p style="text-align: justify">[[File: | + | <pre data-placeholder="Перевод" dir="ltr" id="tw-target-text">15. "Owner": select the owner of the host account.</pre> |
| − | * | + | <p style="text-align: justify">[[File:2020-12-10 18-42-33.png|border|2020-12-10 18-42-33.png]]</p> <pre data-placeholder="Перевод" dir="ltr" id="tw-target-text">Configure the server resource limit for a given host account by setting the MYSQL limit to:</pre> |
| − | * | + | |
| − | * | + | *<pre data-placeholder="Перевод" dir="ltr" id="tw-target-text">MYSQL limit of requests per hour;</pre> |
| − | * | + | |
| − | <p style="text-align: justify">[[File: | + | |
| − | * | + | *<pre data-placeholder="Перевод" dir="ltr" id="tw-target-text">limit of data editing per hour;</pre> |
| − | * | + | |
| − | * | + | |
| − | *IO | + | *<pre data-placeholder="Перевод" dir="ltr" id="tw-target-text">number for parallel connections;</pre> |
| − | *IO | + | |
| − | + | ||
| + | *Limit for user connections per hour; | ||
| + | <p style="text-align: justify">[[File:2020-12-10 18-58-33.png|border|2020-12-10 18-58-33.png]]</p> <p style="text-align: justify">Configure the resource limit for a given host account by setting a maximum value for:</p> | ||
| + | *the number of tasks; | ||
| + | *the amount of memory in MB; | ||
| + | *CPU load (in%); | ||
| + | *IO reading; | ||
| + | *IO recording. | ||
| + | |||
| + | Click on "Add host account" button: | ||
| + | |||
| + | [[File:2020-12-10 19-01-08.png|border|2020-12-10 19-01-08.png]] | ||
Latest revision as of 11:36, 26 July 2021
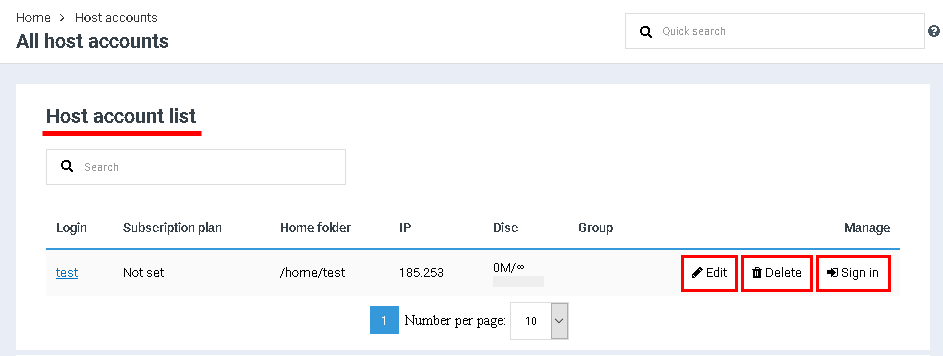
Host accounts are created and edited in the "All host accounts" section of the control panel. In the "Host account list" section, a list of all created host accounts is displayed. When you click on the "Edit" button, a form for correcting data in the account will open - the fields in it are identical to the fields filled in when registering a new host account. Clicking on the "Delete" button will delete the host account. By clicking on the "Sign in" button, the administrator will be asked to log in to the user account:
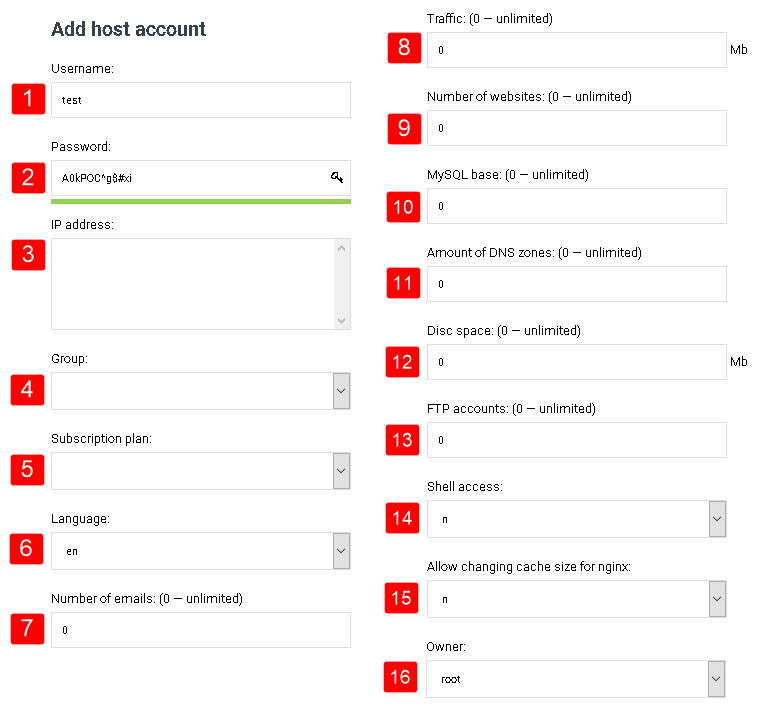
To create a new host-account fill in the following fields:
1. "Username": enter the username (login) in Latin letters.
2. "Password": enter a password or click on the "Generate password" button to generate a code.
3. "IP address": the field is filled in automatically.
4. "Group": Select from the drop-down list the group to which this host account belongs.
5. "Subscription plan": select from the drop-down list the rate according to which the owner of the host account pays for the services.
6. "Language": select the language of the user-side panel interface from the drop-down list.
7. "Number of emails": set a limit on the number of mail accounts (0 - unlimited).
8. Traffic": set a traffic limit (0 - unlimited).
9."Number of websites": set a limit on the number of sites on this host account (0 - unlimited).
10. "MySQL base": set a limit on the number of databases (0 - unlimited).
11. "Amount of DNS zones": set a limit on the number of DNS zones (0 - unlimited).
12. "Disc space": set the disk quota (0 - unlimited).
13. "FTP accounts": set a limit on the number of FTP accounts (0 - unlimited).
14. "Shell access": select from the drop-down list "n" to disable shell access, or "y" to enable shell access.
15. "Owner": select the owner of the host account.
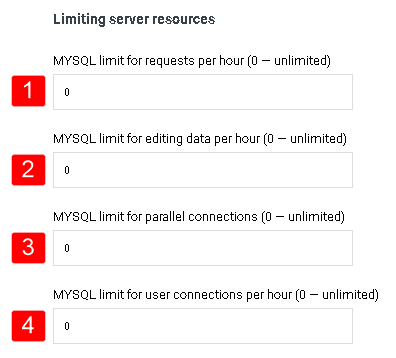
Configure the server resource limit for a given host account by setting the MYSQL limit to:
MYSQL limit of requests per hour;
limit of data editing per hour;
number for parallel connections;
- Limit for user connections per hour;
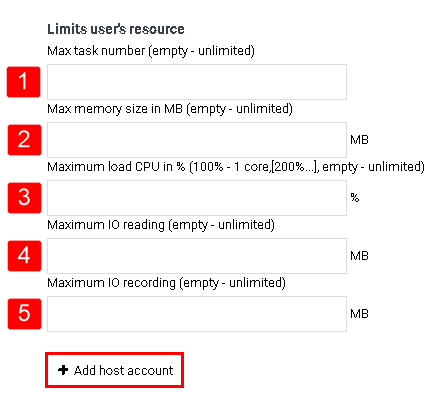
Configure the resource limit for a given host account by setting a maximum value for:
- the number of tasks;
- the amount of memory in MB;
- CPU load (in%);
- IO reading;
- IO recording.
Click on "Add host account" button:


