Difference between revisions of "Setting error pages on website"
From BrainyCP
| Line 1: | Line 1: | ||
| − | < | + | <div data-placeholder="Перевод" dir="ltr" id="tw-target-text">To configure error pages in your BrainyCP hosting control panel, go to Web Server Management / Error Lists.</div> <div data-placeholder="Перевод" dir="ltr">Prepare an error page in one of the valid formats: html, htm, php. Please note that in this section you cannot upload files in a format other than those listed above:</div> |
| − | < | + | #<div data-placeholder="Перевод" dir="ltr">Select the required domain from the drop-down list in the "Site" field and click on the "Select file" button opposite the error code and download the file from your PC.</div> |
| − | + | #<div data-placeholder="Перевод" dir="ltr">When the file is selected, a link to the error page will be displayed in the "View" column.</div> | |
| − | #< | + | #<div data-placeholder="Перевод" dir="ltr">To delete a page with an error, click on the "Delete" button opposite it.</div> |
| − | + | <div style="text-align: justify;">[[File:2020-12-20 0-38-09.png|border|2020-12-20 0-38-09.png]]</div> | |
| − | #< | ||
| − | |||
| − | #< | ||
| − | |||
| − | < | ||
Revision as of 23:41, 8 April 2021
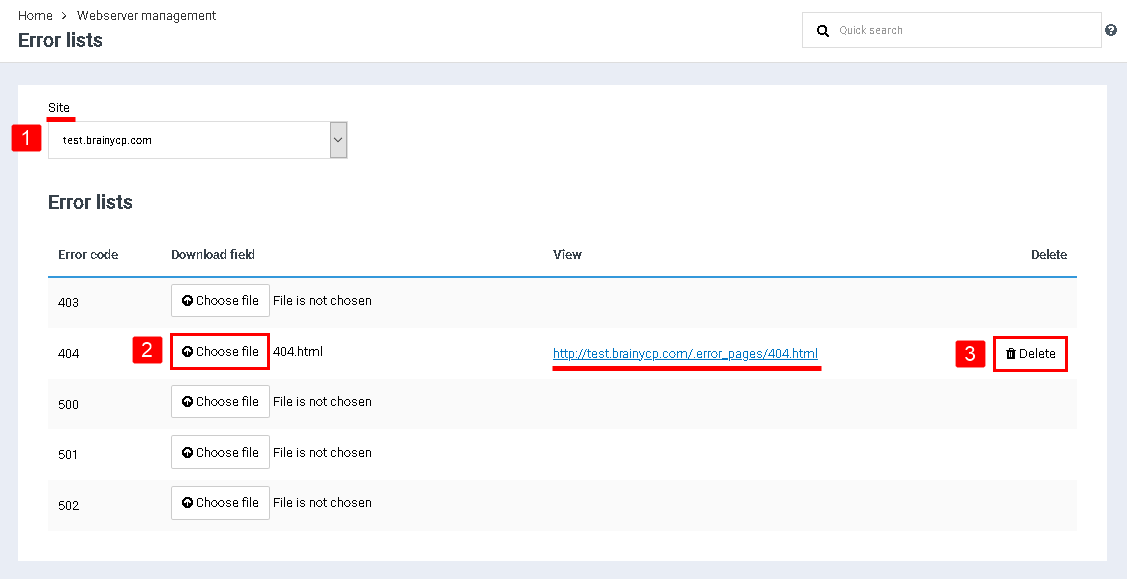
To configure error pages in your BrainyCP hosting control panel, go to Web Server Management / Error Lists.
Prepare an error page in one of the valid formats: html, htm, php. Please note that in this section you cannot upload files in a format other than those listed above:
- Select the required domain from the drop-down list in the "Site" field and click on the "Select file" button opposite the error code and download the file from your PC.
- When the file is selected, a link to the error page will be displayed in the "View" column.
- To delete a page with an error, click on the "Delete" button opposite it.
